Towers Family Chiropractor

Helping You to Better Health Naturally

  • Home
  • About Us
  • Our Chiropractic Services
    • Chiropractic Care
    • Acupuncture
    • Nutrition Services
  • Helpful Videos
    • Posture Screening for Scoliosis and Posture Imbalances
    • Spinal Exercises
  • Patient Forms
  • FAQ
  • Contact Us
  • Chiropractic Solutions
  • Children’s Adjustments
  • Monica’s Recipes
  • Nutrition News
  • Healthy Habits
  • Patient Testimonials
Home » Go Nuts

Go Nuts

May 16, 2022 by towers

Get the best taste out of your raw nuts while making them easier to digest by following these simple steps.  It’s worth the time to make a big batch and store them long-term in the refrigerator.  I try to always have one or more varieties available for snacking or baking or making nut butter–my favorites are walnuts but pecans come in second.  Pumpkin and sunflower seeds are good too.  I have made a nut butter with a walnut and pumpkin seed mix which is yummy–look for the recipe here.  I avoid cashews–they are never truly raw because they have to be heated to remove a poisonous compound.  They may still contain some of this poison ivy-like compound and I wonder if that is why I don’t feel good when I eat them.

So this is what you need to do:

Purchase raw (be sure they are not roasted or pasteurized) nuts.  If you can get organically grown that is best–I order nuts from here. They are expensive but I wait until they have a sale and get enough for free shipping–sign up for their emails for the sale notification.  Then store them in the freezer until you are ready to process them.  For pumpkin and sunflower seeds, I purchase from here.

Measure about 2 quarts of nuts/seeds and place into a large bowl.  Add enough water to totally cover the nuts. Allow to soak overnight or about 12 hours.  Drain and rinse very well until the rinse water is clear–the soak water will be very brown with walnuts and pecans.  The soaking rids the nuts of some harsh-tasting stuff so be sure to rinse very well.  I use a large colander for draining–allow to drain until no water is dripping from the bottom.

Pre-heat an oven to 140 degrees F.  or the lowest setting on your oven.  Spread the soaked nuts/seeds in large shallow baking pans–a thin layer will cut on the drying time needed to thoroughly dry.  Salt the nuts if desired–about a teaspoon of nuts per quart of nuts.  Stir well to distribute the salt–some of it remains on the pan so don’t think this is too much salt–and spread again in an even layer in the pan.  Place the pans in the oven until the nuts/seeds are thoroughly dry.  This may take 4-12 hours depending on your oven temperature and the thickness of the layer in the pan.  The first time you make them check them every 2 hours (stir them while you are at it for quicker drying) by biting into one to see if there is still moisture in the center.  If your oven has a drying option at 140 or lower, they will nut burn if left longer.  In fact, they can may taste better.  Once I left walnuts for 16 hours at 140 and they were very buttery and now I leave them past the point of drying.

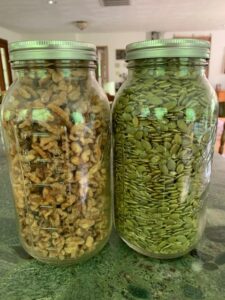
Remove from the oven once thoroughly dry.  Allow to cool and then place in glass jars.  I use 1/2 gallon, wide-mouthed mason jars as pictured above.  Store in the refrigerator.  They will keep for weeks.


Please follow and like us:
error
fb-share-icon
Tweet
fb-share-icon
Print PDF eBook

Filed Under: Monica's Recipes Tagged With: processing nuts, sprouted nuts

Subscribe to get our Blog posts in your email.

* indicates required
/* real people should not fill this in and expect good things - do not remove this or risk form bot signups */

Intuit Mailchimp

(We don't spam or sell your email.)

Recent Posts

  • Safer, Healthier Breast Screening in Roanoke
  • Listen to Your Wife
  • First Time In My Life
  • Four-Season Gardening
  • Cry For Help

Categories

Tags

arm and hand numbness avocado recipe avocado smoothie back pain breastfeeding latching problems butternut squash recipe coconut oil collard greens recipe cultured vegetables daikon radish recipe difficult neck movement dill sauerkraut eggplant recipe foot pain GAPS friendly GAPS friendly recipe gentle chiropractic adjustments gluten-free gluten-free recipe headaches headaches and chiropractic healthy chicken salad herb tea high fructose corn syrup hip pain immune system support jaw pain knee pain knee pain and chiropractic low back pain low back pain and chiropractic migraines neck pain neck pain and chiropractic treatment pesto recipe raw fudge sciatica scoliosis separated shoulder and chiropractic shoulder injury shoulder pain shoulder pain and chiropractic sweet potato soup vegetable juice weight loss

Good Nutrition

Warming Broth for a Cold

When you're feeling down with a cold, the last thing you may want to do is cook!  Well, if you keep a few ingredients on hand you can make this nourishing, soothing broth in a few minutes.  If you … [Read More...]

  • Oatmeal is Back
  • Ginger Punch with a Kick
  • Polenta

Children’s Adjustments

Children's chiropractic adjustment at Towers Chiropractic

Children with back pain

Children suffer injuries that lead to misalignments just as adults do. Children generally respond very well and quickly to gentle chiropractic adjustments. A case in point is that of a 5 year-old … [Read More...]

  • Adjusting Children

Towers Family Chiropractic

2302 Colonial Ave, SW, Ste A
Roanoke, VA 24015
(540) 343-6636

Our hours are:
Monday, Wednesday, Friday:
10:00am – 1:00pm and 2:00pm – 6:00pm
Tuesday, Thursday:
7:30am – 11:30am and 12:30pm – 4:00pm
Saturday:
9:00am – 12:00pm

These statements have not been evaluated by the Food and Drug Administration. The information on this website is not intended to treat, diagnose, prevent, or cure any disease.

Copyright © 2025 · Towers Family Chiropractic by Soupbone Creative