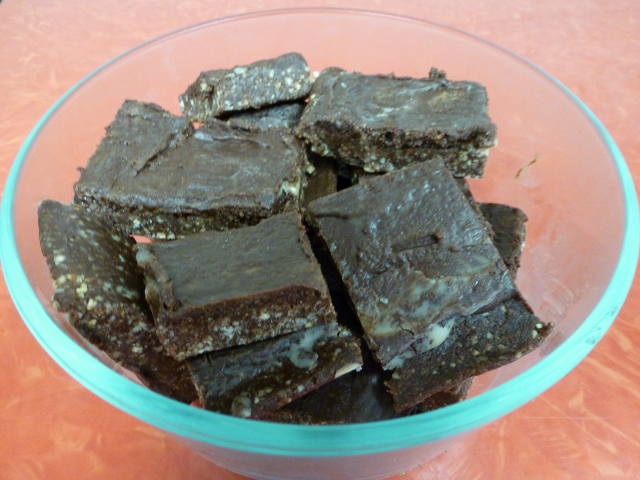
Towers Family Chiropractor

Helping You to Better Health Naturally

  • Home
  • About Us
  • Our Chiropractic Services
    • Chiropractic Care
    • Acupuncture
    • Nutrition Services
  • Helpful Videos
    • Posture Screening for Scoliosis and Posture Imbalances
    • Spinal Exercises
  • Patient Forms
  • FAQ
  • Contact Us
  • Chiropractic Solutions
  • Children’s Adjustments
  • Monica’s Recipes
  • Nutrition News
  • Healthy Habits
  • Patient Testimonials

Buckwheat Pancakes (GF)

March 1, 2015 by towers

Buckwheat pancakes are usually made with buckwheat flour and white wheat flour.  Why not skip the flour and the gluten and try making them with leftover kasha?   I was curious to see if this would work and when I had leftover kasha this weekend I figured it was time to find out.  I discovered it works great–let me know what you think!

These pancakes are gluten-free because the only grain in them is toasted buckwheat (or kasha–don’t confuse this with kashi, the cold cereal).  Cook kasha the same as other grains–about 2 parts water to 1 part grain simmered with a lid on until water is absorbed and the groats are soft (add more water to keep it from sticking to the bottom of the pan).

For 10 small pancakes use:

1 1/2 cups cooked kasha

1 cup ground dry shredded coconut (ground fine in a blender)

2 eggs

1 tsp. vanilla extract

3/4 tsp. baking powder

1/2 tsp. salt

2 Tbsp. arrowroot powder

coconut oil for oiling the skillet

1/2 c. blueberries (optional)

Place all ingredients, except coconut oil and blueberries, in a food processor and blend until thoroughly mixed.  Heat skillet on medium heat.  Lightly oil pan with about 3/4 tsp. coconut oil.  As soon as the pan is hot (but the oil is not burning) spoon 2 Tbsp. batter per pancake ( make them small so that they are easier to flip and be sure the pan is hot enough or your pancakes will stick).  Place 4-5 blueberries on uncooked side of each pancake as soon as you put them in the pan (this way the berries sink in and have plenty of time to heat up even if they are frozen).  Flip as soon as edges start to show tiny bubbles or appear to be set–if not cooked enough they will rip when you flip them.  They are best lightly browned so keep the heat on a low-medium setting once your pan is hot.  Serve with butter if desired.  A little bit of maple syrup will make these a real treat on special occasions.

Filed Under: Monica's Recipes

Collards with Chick Peas

February 23, 2015 by towers

Here’s another fast vegetable dish.  It’s worth cooking a big  pot of beans and keeping pint-sized containers of them in the freezer for later use.   Then when you decide to make this recipe, you can thaw a container in the fridge the night before.  You could add some chopped chicken to this recipe.  I served it with a salad and boiled eggs for a quick meal.  If you want some starch in your meal, toast some Food For Life organic sprouted corn tortillas to eat with this collard dish.

A note on cooking beans:     Be sure to soak the beans overnight in plenty of water..  Rinse them well in the morning and put them in a big cooking pot. Cover the beans with plenty of water (at least a couple of inches over the beans) and add a bay leaf.  Bring to a boil and then reduce heat to  low-medium to keep the beans gently boiling.  Keep a lid on the pot but leave it open a crack.  Depending on how hard your water is the beans may take from 4 to 8 hours to cook thoroughly until soft.  (Be sure to replenish the water so that beans are covered by water by a couple of inches.  If you have hard water I suggest using distilled water for cooking–I have used well water that was so hard the beans never cooked!  I learned this the hard way.) Just give them a stir every hour or so and add more water if you need to.  Make sure to cook until you are able to  mash a few of the beans easily with a fork– they are less likely to cause intestinal gas when well cooked .  Also, do not use the cooking water–it contains compounds from the beans which also contribute to gas.  Some recipes suggest using the cooking water–do not do this!  One final note on reducing the likelihood of getting gas from eating beans–dilute the beans in any dish you are making with plenty of vegetables.  This recipe is a good example of this idea.

Serves 2

2 Tbsp. extra-virgin olive oil

3 cloves of garlic, crushed

2 very small  or 1 medium zucchini, spiralized (or chopped if you don’t have a vegetable spiralizer)

2 cups of finely chopped collard greens

1/2 sweet red pepper,  chopped

1 cup cooked garbanzo beans (also called chick peas)

1 Tbsp. organic wheat-free tamari

salt and pepper

a pinch of cayenne (optional)

Briefly saute garlic in olive oil in a large skillet on medium heat until just starting to sizzle(don’t allow the garlic to brown).  Add the collard greens and stir very well.  Add 1 Tbsp. of water (or chicken or vegetable stock if you have it).  Cover but stir every few minutes.  Once the collards are tender (about 5 minutes) add the chick peas.  If you are going to add some cooked chicken, do it now.  Stir and cover again for a few minutes to heat beans through.  Add the red pepper and stir  well.  After a minute, add the zucchini and stir well again.  At this point be careful not to overcook the red pepper and zucchini–you just want to heat them through but keep them crisp (not limp!).  Add tamari and salt and pepper to taste.  Serve immediately (have everything else ready!).


Filed Under: Monica's Recipes Tagged With: chick pea recipe, collard recipe, dairy -free recipe, garbanzo bean recipe, gluten-free recipe, how to cook legumes

2-for-1 Flounder

February 8, 2015 by towers

No time to cook from scratch?  A common complaint I hear.  I’m well aware that most people need easy recipes and time-saving ideas.  This recipe will illustrate one way that I simplify getting dinner on the table two nights in a row.  Try to always keep the basics on hand—onions, garlic, dried herbs, olive oil, carrots, celery, potatoes–so that it’s easy to pull this off without a lot of planning.  I also always  have zucchini in the refrigerator because we love having a side dish of zucchini noodles (made with the vegetable spiralizer).

Both recipes are gluten-free.  Both could be dairy-free if the butter is left out.

We bought two pounds of flounder that was on sale.  We baked it with olive oil, butter, onion and herbs.  After we ate half of it with an avocado salad and zucchini noodles, I put the rest of the fish with all its juices (scrape the pan well with a spatula) into a pyrex storage container and  place in the fridge for soup for the next day.   The soup can be prepared quickly and is very flavorful.

2 pounds of flounder or cod

2 Tbsp. extra-virgin olive oil

2 large cloves of garlic, peeled and crushed

1 Tbsp. butter sliced in thin pieces

1 medium red onion, finely chopped

1 tsp. dried sweet basil, or dried herb of your choice

salt and black pepper

Oil large baking pan with olive oil.  Add crushed garlic and stir around well.  Wash fish in water and pat dry with some paper towels.  Place each piece of fish flat in the pan rub it in the oil-garlic mixture and flip it over placing flat in the pan again.  This coats the top of the fish with oil and garlic.  Dot fish with butter slices.  Sprinkle salt, black pepper, and basil over fish.  Spread the  chopped onion over the fish evenly.  Bake in 400 degree F pre-heated oven for about 7 minutes or until fish flakes when pierced with a fork.  Do not overbake or the fish will not be tender.  Remove from oven and serve immediately.  Save the juice in the pan (as described above) with any leftover fish.

The next day prepare the fish chowder soup:

1 large red onion, chopped fine

1 carrot, chopped fine

1 medium-sized red potato, chopped in 1/2 inch cubes

1 stalk celery, chopped fine

1/2 cup frozen sweet corn

2 Tbsp. extra-virgin olive oil

1 quart of water

leftover fish mashed with a fork and its juices (which will have hardened)

salt and black pepper to taste

2 Tbsp. mellow miso

Saute onion in olive oil until soft.  Add water and carrots, celery, potato, and corn.  Bring to a boil and reduce heat to low and simmer with a lid on the pan for about 15 minutes or until carrots and potato are cooked through.  Add mashed leftover fish with its juices.  Rinse container out with warm water and add it to the soup (don’t waste any of that flavorful stuff!).  Bring to a simmer again and then heat for about 5 minutes.  In a bowl, mix the miso with some of the broth.  Add this mixture back to the soup pot.  Add salt and pepper to taste.  Serves  4.


Filed Under: Monica's Recipes Tagged With: baked flounder, fish chowder

Theo’s GF Pancakes

February 7, 2015 by towers

My son, Theo, and I made some yummy grain-free pancakes today.  Being grain-free and made mostly with dried coconut and seeds, these pancakes are low glycemic compared to regular wheat pancakes or gluten-free pancakes.  This is an important consideration if you are trying to lose weight or improve diabetes or pre-diabetes–avoid serving them with sugar-concentrated syrups if this is the case. They’re good plain or with some butter.

Makes about 8 pancakes

1 large or 2 small apples, skinned, cored, and quartered

1/2 cup sunflower seeds, ground

1/4 cup pumpkin seeds, ground

1 cup dried coconut

3 eggs

1 tsp. vanilla extract

3/4  tsp. baking powder

1/2 tsp. salt

4 Tbsp. arrowroot flour

-1 cup blueberries, frozen or fresh

some ghee or olive oil for oiling the pan

Blend in a blender the seeds and coconut to a fine powder. ( I used soaked and dried seeds–see the directions for soaking and drying in this seed butter recipe.)   Put the apple and eggs in food processor and process until apple is thoroughly blended.  Add ground seeds and rest of ingredients except the blueberries to the food processor. Process until well mixed. If batter is too thin add a little more arrowroot flour–1 tsp. at a time.  The arrowroot will act as a binding agent but don’t use more than 1/4 cup total.

Heat a griddle or large pan on medium heat.  Oil with ghee or olive oil–about 1 tsp.   Spoon about 2 Tbsp. of batter for each pancake–they will be easier to flip if they are not bigger than 4 inches in diameter.  Put 4 or 5 blueberries on each pancake before flipping so you can push them into the batter.  Flip once the outside edge starts to appear cooked.   If you try to flip it before this point it will break apart.   The pancakes should be lightly browned on both sides.  Serve plain or with butter, or apple butter or a little honey or maple syrup.

Filed Under: Monica's Recipes Tagged With: flourless pancakes, gluten-free pancakes, grain-free pancakes

Creamy Buckwheat Breakfast

December 23, 2014 by towers

Here’s a breakfast idea that is perfect for a cold winter morning.  Kasha is the name for toasted buckwheat and that is all it is–no other ingredients.  It is gluten-free and is available at the Roanoke Natural Foods Co-op in the bulk section if you want to try a small amount.  It is prepared like other grains but in this recipe it is cooked longer with extra water so it becomes “creamy”.  The apple and coconut mellows the stronger taste of the buckwheat perfectly!

To serve 2:

1/3  cup of kasha

1 large apple, cored, peeled and cut in bite-sized pieces

at least 2 cups of water

1/2 cup ground dried coconut (shredded coconut that you blend in a blender–this is how I make coconut “flour”)

cinnamon to taste, about 1/2 tsp.

1 -2 tsp. butter, optional,  and coconut oil could be substituted

Place kasha, water, ground coconut, and apple in a saucepan and bring to a boil.  Immediately decrease to low heat so mixture simmers.  Cover with the lid cracked open.  Stir every 5 minutes or so.  Simmer until kasha “dissolves” and the mixture is creamy.  This may take 30-45 minutes so add water if needed to maintain a porridge-like consistency.  Add cinnamon to taste and butter or coconut oil if desired.  We like it unsweetened but maple syrup or raisins could be added if you really must have it sweet.

Filed Under: Monica's Recipes Tagged With: how to cook kasha, kasha recipe, winter breakfast recipe

Pumpkin Pie, GF/DF

December 13, 2014 by towers


Did you know that butternut squash makes a great pumpkin pie?  And, of course, making a gluten-free, dairy-free pie that is delicious is easy!  Place a medium-sized butternut in a baking pan and bake it whole in a 350 degree F oven for 1 hour or until very soft.  Cut in half and remove seeds.  Scoop out the “flesh” once cooled to room temperature and you are ready to make your pie.  This recipe also uses coconut milk instead of milk or cream.  And the crust can be made gluten and grain-free as this recipe demonstrates.

Filling

3 cups cooked butternut squash

1/2 cup organic sugar (I use sucanat)

2 tsp. ground cinnamon

1/2 tsp. ground ginger

1/4 tsp. ground nutmeg

1/4 tsp. ground cloves

3 eggs

1 cup organic coconut milk (classic, not lite)

1/2 tsp. sea salt


Pie crust

3/4 cup sunflower seeds, finely grounded in a blender or processor

1 cup dried shredded coconut, finely ground in a blender or processor

1/4 cup arrowroot powder

2 tsp. honey

1/2 tsp. vanilla extract

pinch of sea salt

1 Tbsp. ghee or coconut oil

1 small egg

Grind the sunflower seeds and shredded coconut separately before proceeding to insure they are well ground.  Place all crust ingredients in food processor  and process well.  If mixture is sticky add 1 tsp. more of arrowroot powder at a time processing after each addition until mixture is not sticky.  Press evenly into pie pan with your hands.  Prick the center with a fork.  Now make the filling.

Put squash, sugar, and all spices and salt in food processor and process well.  Add coconut milk and process again.  Add eggs and process until thoroughly mixed.  Taste for sweetness and add either 1/4 cup more sugar or liquid stevia a few drops at a time (processing well after each addition) until sweet enough for your taste.  Pour filling into pie crust.  Bake in a preheated 375 degree F for 45 minutes.  During baking cover with foil once crust is lightly browned to avoid burning crust.  Continue baking until filling is set, checking every few minutes with a tooth pick until it comes out clean.  Remove pie from oven.  Cool thoroughly before serving.

Filed Under: Monica's Recipes Tagged With: arrowroot powder recipe, butternut recipe, butternut squash pie, coconut milk in pumpkin pie, grain-free pie crust, pumpkin pie gluten free and dairy free

Roasted Sweet Potatoes with Tumeric

November 19, 2014 by towers

Sweet potatoes are a wonderful winter food and this is a tasty way to get the anti-inflammatory and anti-cancer components of turmeric into the diet. There was a restaurant in Trumansburg, NY that served sweet potato fries with an interesting dip that was made with turmeric and mayo. This is my attempt at reproducing this combination of flavors easily but without the mayo.   We have buckets of home-grown sweet potatoes of 3 varieties in our basement.    You can use any variety of sweet potato but it is always better to buy organically grown.

3 medium sized sweet potatoes, skinned, halved lengthwise ,and then sliced  crosswise into 1/4 inch slices

2 Tbsp. extra-virgin olive oil, or 1 Tbsp each of coconut oil and olive oil

1 tsp. turmeric powder

1 tsp. sea salt,

1/4 tsp black pepper

pinch of cayenne, optional

Melt the coconut oil in a medium-sized sauce pot over low heat and add the olive oil.  Add the turmeric, cayenne, and salt and black pepper.  Take off the heat after 2 minutes of stirring. Stir in  the sweet potato slices and continue to stir until the potatoes are well coated.  Transfer the potatoes  into a shallow baking dish and spread evenly–ideally they are spsread to about 1 layer thick.   Roast in a 375 degree F preheated oven.  Use a spatula to flip the potatoes after 15 minutes minutes.  As soon as the potatoes are lightly browned and tender inside (usually about 20-30 minutes), remove from the oven.  Serve immediately.  Serves 3-4.


Filed Under: Monica's Recipes Tagged With: roasted sweet potatoes, sweet potato fries with turmeric, turmeric recipe

Homemade Ginger Lemon Tea

November 4, 2014 by towers

If you feel nausea upon waking, consider drinking ginger lemon tea.  This problem may be related to toxic bile from the liver/gallbladder.    Some folks may get diarrhea when they eat (especially those who’ve had the gallbladder removed) while others may have a problem with constipation.  This tea is a good bet for either as the lemon is cleansing to the liver and assists with good bowel function, and the ginger helps with nausea.  While these are signs that you need to clean up the diet and work to insure that you’re having daily, well-formed bowel movements, in the short-term it’s a blessing to have an immediate remedy in your kitchen/medicine cabinet!  If you prefer to make this easier, you can use 2 ginger tea bags instead of fresh ginger.

1 Tbsp. of grated or very thinly sliced fresh ginger root

2 cups of pure water

juice of 1/2 a lemon

1 tsp. honey, optional (avoid if you are overweight, pre-diabetic or diabetic)

peppermint sprig (optional)

stevia extract or monk fruit powder to taste (optional)

In a pint-sized glass jar, place the ginger.  Boil 2 cups of water and pour over the ginger.  Cap the jar and let stand overnight if you want a stronger tea (you can warm it up again in the morning if you want to drink it hot) or until it cools to desired temperature for a milder tea.  Strain tea into mug and add lemon juice, mint if desired, honey, and stevia or monk fruit if desired.  Drink  first thing in the morning.


Filed Under: Monica's Recipes Tagged With: fresh ginger tea, ginger tonic for nausea, lemon juice for liver, lemon water for constipation, tea for constipation, tea for nausea

Chicken Zoodle Soup

October 15, 2014 by towers

Previous recipes posted here have featured zucchini “noodles” (for which I have just coined the name zoodle) and chicken broth.  This soup is super easy if you have these 2 items plus a few other basics on hand.  It’s no secret that I am no fan of pasta–so this is my version of chicken noodle soup!  If you make the chicken broth according to this linked recipe, it is so flavorful that this soup needs little seasoning.

1 small zucchini, spiralized with a vegetable spiralizer or a julienne vegetable peeler

2 cups homemade chicken broth

1/2 cup of a mix of other vegetables:  green peas (frozen ok), chopped carrots, finely chopped onions

1/2 cup chopped chicken meat (optional)

2 tsp. mellow white miso (MisoMaster brand is good)

salt and black pepper to taste

Heat broth in soup pot on medium heat until simmering.  If you want to add onions to your soup, sauté them first in some olive oil until soft and then add them to the broth.  Add other vegetables to the broth except zucchini.  As soon as other veggies are tender, add the chicken.  Simmer for a few minutes and then add the zucchini “zoodles”.  Simmer for just a few minutes more so as not to overcook the zucchini–it should be firm so it resembles pasta.  Take off heat.  Mix miso in a bowl with a few tablespoons of the hot broth from the soup and then add this mixture to the soup.  Stir well.  Add salt and black pepper to taste.  Best served immediately.


Filed Under: Monica's Recipes Tagged With: chicken soup, gluten-free chicken noodle soup, grain-free chicken noodle soup

Sunflower/Pumpkin Seed Butter

September 15, 2014 by towers

This is a yummy peanut and nut butter substitute, yet it’s a good choice too for people who don’t have peanut or tree nut allergies because it supplies coconut fatty acids and the good fats in the seeds.   Even though the seed soaking and drying step complicates this recipe, it’s worth it because soaked seeds are easier to digest.  I try to keep this soaked-then-dried seed mixture (2 parts sunflower to 1 part pumpkin) on-hand by making a big batch at one time so that I have plenty for snacking (add some salt) plus extra for recipes such as this one and the Lime Pie I recently posted.  (Extra soaked/dried seeds should be stored in the refrigerator.)  The ghee in this recipe adds a butterscotch flavor and makes the mixture spread more easily.  You can adjust the amount of honey to suit your taste and you can leave out the cocoa powder if desired.  Enjoy it on apple slices, a banana, celery sticks, or crackers.

1 cup raw (unsalted/no added oil)  sunflower seeds

1/2 cup raw (unsalted/no added oil) pumpkin seeds

1/4 cup honey or 6 medjool dates, pitted

1 tsp. vanilla extract

1/2 tsp. sea salt

2 Tbsp. coconut oil

2 Tbsp. ghee

1-2 Tbsp. raw organic cocoa powder (optional)

Soak the sunflower and pumpkin seeds in one quart of water in a bowl or glass jar overnight or at least 8 hours.  Rinse very well in a colander and allow to drain well.  Spread the soaked seeds out in a baking pan and dry in a 150 to 250 degree F oven.  It will take longer to dry thoroughly in a lower temperature oven (about 2 to 3 hours) but  it is better for preserving more nutrients.  Keep in mind that the seeds will dry more quickly if you use a larger baking pan as they will be spread out more.  Stir well every 30 minutes to evenly dry the seeds.  As soon as the seeds are lightly browned and dry, remove from oven.

Place the roasted seeds in a food processor and process until finely ground.  Add other ingredients except the oil and ghee.  Pulse until well mixed. If the coconut oil and/or ghee is solid, melt until liquid on low heat on the stovetop.  Add the oils while the processor is running and process until thoroughly mixed.  Transfer to a glass storage container or a jar.  Keep refrigerated.  If the seed butter is too hard to spread easily, leave it at room temperature until it softens—about 15 minutes.

Filed Under: Monica's Recipes

« Previous Page
Next Page »

Subscribe to get our Blog posts in your email.

* indicates required
/* real people should not fill this in and expect good things - do not remove this or risk form bot signups */

Intuit Mailchimp

(We don't spam or sell your email.)

Recent Posts

  • Safer, Healthier Breast Screening in Roanoke
  • Listen to Your Wife
  • First Time In My Life
  • Four-Season Gardening
  • Cry For Help

Categories

Tags

arm and hand numbness avocado recipe avocado smoothie back pain breastfeeding latching problems butternut squash recipe coconut oil collard greens recipe cultured vegetables daikon radish recipe difficult neck movement dill sauerkraut eggplant recipe foot pain GAPS friendly GAPS friendly recipe gentle chiropractic adjustments gluten-free gluten-free recipe headaches headaches and chiropractic healthy chicken salad herb tea high fructose corn syrup hip pain immune system support jaw pain knee pain knee pain and chiropractic low back pain low back pain and chiropractic migraines neck pain neck pain and chiropractic treatment pesto recipe raw fudge sciatica scoliosis separated shoulder and chiropractic shoulder injury shoulder pain shoulder pain and chiropractic sweet potato soup vegetable juice weight loss

Good Nutrition

Warming Broth for a Cold

When you're feeling down with a cold, the last thing you may want to do is cook!  Well, if you keep a few ingredients on hand you can make this nourishing, soothing broth in a few minutes.  If you … [Read More...]

  • Oatmeal is Back
  • Ginger Punch with a Kick
  • Polenta

Children’s Adjustments

Children's chiropractic adjustment at Towers Chiropractic

Children with back pain

Children suffer injuries that lead to misalignments just as adults do. Children generally respond very well and quickly to gentle chiropractic adjustments. A case in point is that of a 5 year-old … [Read More...]

  • Adjusting Children

Towers Family Chiropractic

2302 Colonial Ave, SW, Ste A
Roanoke, VA 24015
(540) 343-6636

Our hours are:
Monday, Wednesday, Friday:
10:00am – 1:00pm and 2:00pm – 6:00pm
Tuesday, Thursday:
7:30am – 11:30am and 12:30pm – 4:00pm
Saturday:
9:00am – 12:00pm

These statements have not been evaluated by the Food and Drug Administration. The information on this website is not intended to treat, diagnose, prevent, or cure any disease.

Copyright © 2025 · Towers Family Chiropractic by Soupbone Creative