Towers Family Chiropractor

Helping You to Better Health Naturally

  • Home
  • About Us
  • Our Chiropractic Services
    • Chiropractic Care
    • Acupuncture
    • Nutrition Services
  • Helpful Videos
    • Posture Screening for Scoliosis and Posture Imbalances
    • Spinal Exercises
  • Patient Forms
  • FAQ
  • Contact Us
  • Chiropractic Solutions
  • Children’s Adjustments
  • Monica’s Recipes
  • Nutrition News
  • Healthy Habits
  • Patient Testimonials

Butternut Casserole

February 27, 2017 by towers

The easiest way to prepare butternut squash is to bake it whole in a 350 degree oven until it is soft and easily pierced with a knife.   It is quick to then peel the skin off, slice it in half and scoop out the seeds.  Now you are ready to maker soup, “pumpkin” pie (I’ve always made this with butternut), and casseroles.  Here’s a great recipe full of vegetables with some eggs thrown in for protein!  Serve with a salad and some fish or chicken and you have a substantial meal that is not high in carbohydrates.

Serves 4

2 cups cooked butternut squash

1/2 large onion chopped, about 1 cup

3/4 cup chopped zucchini

3/4 cup green peas, frozen

1/2 cup toasted or raw sunflower seeds

1 Tbsp. extra virgin olive oil

1/2 tsp. salt and black pepper, each

grated pecorino or parmesan cheese, optional

2 eggs

1 T tamari

1 tsp. dried thyme

Beat eggs well in a bowl and add tamari and thyme and beat again.  Mash the butternut squash and then mix it into the egg mixture.  Set aside.

In a skillet, heat the olive oil and add the onions.  Stir over medium heat for 2-3 minutes.  Add the zucchini and peas.  Continue to stir over medium heat until the vegetables are heated through–about 5 minutes over medium heat.  Add the sunflower seeds and salt and pepper.  Stir well.

Now mix the squash mixture into the vegetables in the skillet.  Transfer into a casserole dish, sprinkle with cheese if desired, and bake in 350 degree oven for about 30 minutes or until slightly browned on top.  Serve hot.


Filed Under: Monica's Recipes Tagged With: butternut squash recipe, vegetable casserole recipe

Sweet Potato Soup II

December 15, 2016 by towers

Ever wonder what to do with leftover sweet potatoes?  Here’s an easy way to make a quick soup and use them up.  It is really quick if you have an immersion blender.  This recipe is different from the first one I posted–it’s a variation on the leftover sweet potato theme that features miso.

Miso, or fermented soy or chickpea paste, is not in most people’s kitchens–if it hasn’t been in yours, consider keeping some in the fridge.  It is a good source of probiotics (don’t add it until the end of cooking so it doesn’t get cooked) and adds to the flavor of many soups.  In fact, you can add only miso to a bone, meat, or vegetable broth and it makes a delicious soup (1 tsp of miso to 1 cup of broth).  Traditionally, miso is made from soybeans but there is a soy-free chickpea miso that is made by MisoMaster that I like very much.  Either could be used in this soup, but if you use soy miso use the mild kind–it’s called mellow white miso.

Serves 4

2 large sweet potatoes, baked until very soft and then skinned–may be leftover

2 medium-sized onions

3 Tbsp. ghee or butter

2 cups vegetable, bone, or meat broth; or you can use water

1/4 cup coconut milk (canned, classic)

1 tsp. cumin powder

1/8 tsp. clove powder

1/8 tsp. cinnamon powder

2 Tbsp. chickpea miso

salt and black pepper to taste

In a medium sauce pan melt the ghee or butter over medium heat and add the chopped onions.  Stir every minute or so and continue to sautee until the onions are soft for about 5 minutes.  Add the spices and stir well.  Add the sweet potato (cut into chunks) and the broth or water and keep on medium heat with an occasional stir until  it simmers.   Add coconut milk.  Heat another 5 minutes or so.  Take off the heat and blend until smooth and creamy.  Add miso and blend again.  Taste and add salt and pepper as desired.  Serve immediately.

Filed Under: Monica's Recipes Tagged With: chickpea miso recipe, miso sweet potato soup, sweet potato recipe, sweet potato soup

Easy Eggs with Red Onion

October 24, 2016 by towers

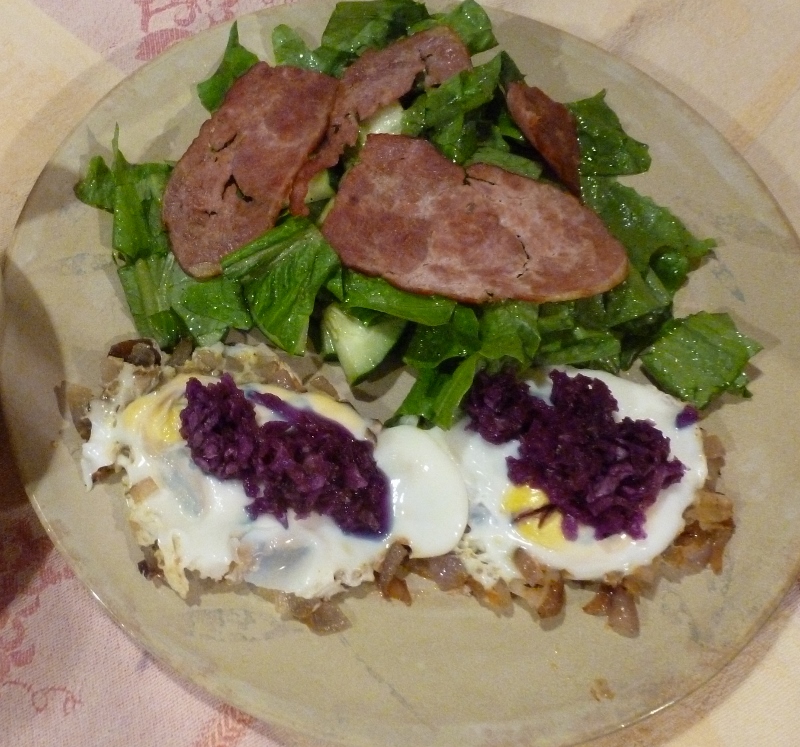
Sometimes, you discover a new recipe because you are trying to use up something.  I have a lot of onions from my garden and some of them are starting to sprout–they need to be eaten before they start to go bad.  We always have good eggs and ghee on hand, and I happened to have some Shitake mushrooms.  Also, we always have cultured vegetables in the fridge.  This recipe is better than just frying eggs and easier than an omelet.  The photo shows the eggs   served with turkey bacon on a salad.  We are quickly incorporating more vegetables into a meal–that’s what most people have the hardest time doing.  It’s not really hard; it’s a new way of thinking. I hope this recipe offers some inspiration.

1 large red onion, chopped fine

1/2 cup chopped Shitake mushrooms

1 Tbsp. ghee

1/2 tsp. sea salt (add more if desired but not if you use Emeril’s Essence which has salt in it)

1 tsp. dried herb or spice of your choice (sweet basil or Emeril’s Essence are both good.  Use less salt if you use Emeril’s Essence)

4 eggs from pasture-raised chickens

1/2 cup cultured vegetables (red cabbage–see Waldorf Salad recipe, or use store-bought raw sauerkraut)

Melt ghee in a medium-sized skillet.  Add onions and stir over medium heat for 5 minutes until tender.  Add mushrooms, salt, and herb or spice and stir well.  Saute for another few minutes.

Crack eggs on top of vegetables–drop one egg on each quarter of the skillet but keep the eggs closer to the center so the whites don’t go down the sides of the pan.  The pan will be easy to clean if you can keep the eggs right on top of the vegetables–it will look better too! When you use fresh eggs, the whites are less runny and this is easier to accomplish.  Now reduce the heat to low and cover the pan with a lid.  Remove from heat once the eggs are cooked to your satisfaction–I prefer the yolks just set and not runny.

Cut into quarters–one egg on top of each quarter.  Use a spatula to lift out.  It should stay intact and remove easily.  Serve immediately with a tablespoon or two of cultured vegetables on top.


Filed Under: Monica's Recipes

GF Crab Cakes

October 17, 2016 by towers

When you make your favorite recipes or when you decide to cook from scratch instead of buying ready-made, think quality ingredients.  With experience you will learn how to substitute ingredients so that you can make your favorite foods gluten or dairy-free–and a lot healthier for you.    These crab cakes are an example–the recipe on the can of real crab meat was a beginning. Instead of bread crumbs, I used ground sunflower seeds and a little arrowroot flour and some nutritional yeast.  I had on hand homemade mayo (follow link to Waldorf salad recipe which contains the mayo recipe) made with extra-virgin olive oil/sunflower oil and eggs from pasture-raised healthy chickens.  And, of course, I used a good quality oil for browning.  The Emeril’s Essence is a fantastic spice blend for seafood and eggs–you can either mix some yourself by following the link and using the original recipe or you can buy it already mixed.

We don’t eat shell fish very often because of the pollution of  coastal waters (toxic metals are common contaminants) but on occasion we make an exception.  So these are a real treat when we make them– make enough to freeze some for a quick meal when you don’t have time to cook.  Serve with a mix of equal parts organic ketchup and prepared horseradish.

Approximately 8 crab cakes

16 oz. can of real crab meat (this is a refrigerated item) (claw meat is fine to use)

1 medium-sized onion, chopped fine

3-4 Tbsp. extra-virgin olive oil

1 beaten egg

2 Tbsp. organic mayonnaise

1 Tbsp. prepared yellow mustard

1 tsp. tamari (organic and wheat-free)

1 Tbsp. lemon juice

1 Tbsp. hot sauce

1/2 c. ground sunflower seeds (use a blender to grind hulled seeds)

1 Tbsp. arrowroot flour

1 tsp. Emeril’s Essence

1 tsp. salt

1/2 tsp. ground black pepper

Saute the onion in 1 Tbsp. extra-virgin olive oil in a skillet until softened and slightly browned.  Take off the heat and set aside.

In a medium-sized mixing bowl, whisk the egg well and then add the mayo, mustard, lemon juice, tamari, and hot sauce.  Blend thoroughly with the whisk. Set aside.

In a 1-cup measuring cup measure the sunflower seed meal and then add the nutritional yeast, arrowroot flour, and Emeril’s Essence. Mix these dry ingredients well.  Set aside.

Drain and discard the water from the crab meat in the can.  Add the crab meat to the egg mixture.  Mix well and break up the crab meat so that the pieces are all bite-sized.  Add the sauteed onions and mix again.  Add the dry ingredients plus the salt and black pepper.  Mix thoroughly.  Form the cakes by pressing spoonfuls of the mixture in a 1/2 cup measuring cup.  Tap the cup on its bottom over a plate to get the cake out–now you are ready to brown the cakes. If you want to freeze some, this is the time to do it.  (Later when you remove frozen cakes, just put them in a toaster oven at 350 for about 30 minutes–since they are frozen this is the best way to cook them.)

In a large skillet on medium heat pour the remaining olive oil.  Once the oil is hot (but not smoking–don’t let it burn!) place the crab cakes.  Brown for about 4-5 minutes on each side.  Serve immediately.


Filed Under: Monica's Recipes Tagged With: crab cake recipe, gluten-free crab cakes

Hummus

October 10, 2016 by towers

The “perfect plate” of food is half vegetables— providing a variety of color, texture, and nutrients.   Protein and starchy foods take a back seat to vegetables on the plate (they each get a quarter of the plate).   This requires shopping two times a week so there’s always lots of fresh vegetables in the refrigerator.   Hummus– a spicy, rich garbanzo bean dip that is easy to make– is delicious with vegetable sticks and salads. This recipe uses ground sesame seeds (use hulled seeds–the whiter ones–instead of unhulled for a milder sesame taste) and sesame oil instead of tahini.

Hummus 

2  ½ cups cooked garbanzo beans (or cook dry beans*)

2 medium cloves garlic, crushed

Juice of 1 lemon

½ cup extra-virgin olive oil (or ¼ cup sesame oil and ¼ cup olive oil)

½ cup ground hulled sesame seeds (buy hulled sesame seeds and grind in a blend)

½ tsp. ground cumin seed

1 tsp. sea salt

Black pepper and cayenne powder to taste

*If using dry beans, soak about 3 cups overnight and then rinse well—this will make about 6 cups cooked.  Place in at least a 4-quart pot and cover with 2-3 quarts of water.  Bring to a boil and reduce heat to a steady simmer.  Add water as needed to keep beans well covered.  Simmer until very soft (3 or more hours).  Drain well.

In food processor, process beans with all other ingredients until thoroughly mixed and processed into a smooth spread.  Chill.  Serve with vegetable sticks or salad.

Filed Under: Monica's Recipes

Mango Ice Cream

August 17, 2016 by towers

When you want ice cream consider making it yourself–it’s easy and likely will be much better for you!  Mango makes a creamy full-bodied ice cream and you can adjust the amount of honey you use to suit your taste.  You could also try skipping the honey and adding stevia to sweeten–I haven’t tried this but I bet the sweetness and flavor of mango would work with stevia.  You can make this dairy-free by using all coconut milk and omitting the yogurt.

I used an ice cream maker that takes about 20 minutes to thicken and freeze the mixture.  It is best to start with frozen fruit and chilled coconut milk–it will thicken much faster.  Our local Fresh Market had organic mangoes on sale so we bought several, cut them up and froze them.  That’s what inspired this recipe.


Serves 4

2 cups of cut up frozen mango (you can use fresh but it will take longer to freeze)

1 cup organic Greek yogurt (or omit this and use 2 cups of coconut milk)

1 cup of organic, classic (not light) coconut milk, chilled in refrigerator

1/2 cup honey

2 tsp. vanilla extract

pinch of sea salt

Optional:  some fresh strawberries slices as topping and/or toasted coconut flakes

If you are using frozen mango, pulverize the frozen mango pieces in a food processor.  If they are frozen together, cut them up first or your processor will have trouble pulverizing them.  Set aside in a separate bowl.

Place all other ingredients except toppings in the processor and blend well. If you are using fresh mango blend it with everything else at this step.  If not, stir this mixture into the bowl with the pulverized frozen mango.  Mix well.  Taste and add more honey or stevia to sweeten more.

Pour this mixture into the ice cream maker and follow directions for freezing.  Serve immediately with the topping if desired.


Filed Under: Monica's Recipes Tagged With: dairy-free mango ice cream recipe, fresh fruit ice cream recipe, mango ice cream recipe

GF Pizza

June 26, 2016 by towers

This recipe was originally posted in Sept. of 2015.  I’ve made some changes that improve the crust.  I’ve started making this again as our garden is supplying a bumper crop of zucchini this year!  Something to consider if you have an abundance of zucchini:  grate and squeeze out the water  as described below and store in the freezer in zip-lock bags (2 cups per bag) for pizza or soup during the winter months ( you will need to thaw it in the refrigerator for a day before using for dough but you can add it frozen to soups or stews). Don’t discard the juice–such a waste!  Either add small amounts (it is pretty salty) to vegetable juice or make an avocado smoothie or add to soups (and add less salt to your soup).

Pizza dough does not have to be high glycemic (high in carbohydrates that quickly and significantly raise blood sugar).  If you use gluten-free baking mixes that are high in starch you are avoiding gluten but you are still pushing your body’s sugar handling ability to its limits–besides that these mixes of various gluten-free starches are notoriously difficult to digest and so create indigestion and gas in many people.  This recipe dilutes the corn flour that is the basis of the dough with zucchini so it provides a lot less starch per serving than the gluten-free dough.  Besides that it is a great way to make good use of big zucchinis that your garden or your neighbors may have provided you!  I had 2 foot-long zucchini that I almost pitched in the compost when this recipe popped into my head.  Perhaps you remember the zucchini crusted pizza recipe from the classic Moosewood Cookbook–the dough in her recipe has more of a crepe texture than a crust texture but her use of zucchini inspired me.  The finished product here is more crusty.  Be sure to squeeze out the liquid from the grated, salted zucchini or you’ll ruin the crust.  As for toppings, use what you like.   I have a lot of roasted tomatoes preserved in olive oil on hand so I used that instead of tomato sauce.  You could also keep it simple and use pesto or fresh slices of tomato instead of sauce.  Other options are olives, artichoke hearts,and anchovies, all of which will jazz it up if you are dairy-free and omit the  cheese.

One other note on the corn flour:  I used organic masa harina made from organic whole corn instead of regular unrefined corn flour.  You can use either (be sure that you buy organic or it may be GMO)  but organic masa harina is harder to find.  I had to order it from Amazon.  In case you don’t know, masa harina is the traditionally prepared form of corn flour (cooked and soaked in lime water before grinding) that is more nutritious than regular corn flour.   It is easier to digest and makes a softer dough also.

Dough for 1 12-inch pizza round

zucchini (1 large or 2 medium-sized that equals about 2 -3  cups grated)

1 and 1/4 cup masa harina corn flour or 100% whole corn flour

1/4 cup hulled sesame seeds, ground in blender

4 Tbsp. arrowroot flour

1 egg

1 tsp. baking powder

1  tsp. sea salt for dough and 3/4 tsp. sea salt for zucchini

1 Tbsp. extra-virgin olive oil, plus 1 Tbsp. for oiling pan

Grate the zucchini with a vegetable grater into a large bowl and add 3/4 tsp. sea salt.  Stir well and let sit 15 minutes.  Line a colander with cheese cloth or a light weight kitchen towel and place over a bowl (if you want to save the zucchini juice to drink or add to broth or soup) or in the sink (if you want to discard the juice).   Transfer the grated zucchini into the colander and let the juice strain out for a few minutes.  Gather the corners of the cloth and tighten it by twisting so that the juice is squeezed out.  You won’t get the zucchini totally dry but you do want to remove as much liquid as possible.

Place all ingredients  into a food processor except the zucchini.  Process until well mixed.  Add the grated, dry zucchini and process again briefly until just mixed and forming a soft dough.  If a ball of soft- but -not -wet dough does not form, add more masa harina 2 Tbsp. at a time processing after each addition until a good dough forms.  The dough should be easy to handle–not sticking to your hands–so that you can press it into a well-oiled  baking tray  or pizza pan (use 1 Tbsp. olive oil).  Bake at 325 degree F oven for 10 minutes.  Remove from oven and cover with your chosen toppings.  I brush the crust with 2 Tbsp.olive oil containing 2 cloves crushed garlic and then top with roasted tomatoes (these won’t be as watery as fresh tomato slices), chopped sweet red pepper, olives, and grated cheese–you can use grated romano (sheep’s milk) or feta (goat’s milk) cheese if you are avoiding cow milk products.  Bake at 375 for 15 minutes or until toppings are  cooked through or cheese is lightly golden.

Filed Under: Monica's Recipes Tagged With: gluten-free pizza dough, masa harina pizza dough, zucchini pizza dough

Sweet Avocado Smoothie

June 10, 2016 by towers

Here’s a low-glycemic breakfast or snack for you.  Similar to the chocolate pudding I posted previously, this recipe skips the banana and uses a little stevia to sweeten.  Also, we add a little protein and good nutrition with the collagen and egg yolks (only use the best quality eggs from free-range chickens that are organically fed–crack into a cup first to inspect as the yolk should stay intact with no odor).  If you are not eating eggs the eggs yolks could be left out.  A quarter cup of berries could be substituted for the cocoa powder.  That’s the nice thing about smoothies–you can really mix it up.

Serves 1

1/2 ripe avocado (skin firm but gives a little, inside still light green without brown)

1/3 to 1/2 cup water or zucchini “water”

1-2 tsp. raw organic cocoa powder

stevia extract

1-2 Tbsp. Great Lakes collagen powder

2 egg yolks

1/2 tsp. vanilla extract

Place all ingredients in a blender container except egg yolks and stevia.  Blend well.  Add egg yolks and blend by pulsing a few times–proteins in egg yolks supposedly can be damaged by blending so I take the precaution of adding them last and then blending briefly until just mixed.  Taste and add stevia to taste.


Filed Under: Monica's Recipes Tagged With: avocado smoothie, Dairy free smoothie, low-glycemic smoothie

Salad with Zucchini Spirals

May 23, 2016 by towers

We are already getting zucchini from our garden thanks to an early start in the greenhouse.  Here’s another recipe using spiralized zucchini–along with some cultured red cabbage which you will need to make ahead.  You could substitute store-bought fermented vegetables if you have them on hand.  A little olive oil, vinegar, salt and pepper and you have a wonderful salad.

Serves 2 (large salad)

4 cups lettuce pieces or baby lettuce

1/2 cup cultured red cabbage

1 small zucchini, spiralized

1/4 cup feta cheese

2 Tbsp. extra-virgin olive oil

1 Tbsp. balsamic vinegar

salt and pepper to taste

Place 2 cups of the lettuce in each of 2 salad bowls.  Add half the zucchini spirals, red cabbage and feta cheese to each bowl.  Toss to mix well. Drizzle the olive oil and vinegar over the salads.  Salt and pepper to taste.

Filed Under: Monica's Recipes Tagged With: cultured red cabbage salad recipe, zucchini spirals recipe

Potato Eggplant Saute

May 23, 2016 by towers

If you like potatoes but avoid them because you are watching your blood sugar levels, try diluting the potatoes with other non-starchy vegetables.  This way you get to eat your potatoes and feel satisfied but not STUFFED and HEAVY afterwards.  This recipe uses eggplant and only 1 potato.  It’s easy and fast–if you cube the potato and eggplant small enough (between a 1/4 and 1/2 inch cubes), they will cook quickly.  Serve these with turkey burgers and a salad and you have a meal.

Serves 3

1 medium-small eggplant (about 1-1/2 to 2 cups cubed–skin first with a potato peeler, then cut crosswise into 1/4 inch rounds, then cut the rounds into cubes)

1 medium red potato, leave skin on, wash well & cut as described above

1/3 cup frozen green peas

2-3 Tbsp. ghee or olive oil

1/2 tsp. dried onion granules (the Co-op has organic in bulk section)

1/4 tsp. dried garlic powder (Co-op has organic in bulk section)

salt and pepper to taste

Prepare the vegetables as described above.  Melt ghee in a large skillet over medium heat.  Once hot (don’t overheat or it will smoke–keep an eye on it and add 1 cube to see if it sizzles–as soon as it sizzles it is hot enough), add the rest of the potato cubes.  Stir with a metal spatula so potatoes get covered in oil.  Cover with a tight fitting lid for 3 minutes and then stir again to prevent sticking. Cover again for 3 minutes and stir again.  Add eggplant cubes and spices.  Mix  well.  Eggplant tends to soak up oil so you may need to add another tsp. or 2 of ghee or olive oil if the mixture seems dry and is sticking–stir well again.  Cover and use spatula to prevent sticking every 3-4 minutes until potatoes and eggplant are tender. Add peas and stir.  Turn off heat and cover for a few minutes.  Add salt and pepper to taste.  Serve immediately.


Filed Under: Monica's Recipes Tagged With: eggplant recipe, eggplant/potato recipe

« Previous Page
Next Page »

Subscribe to get our Blog posts in your email.

* indicates required
/* real people should not fill this in and expect good things - do not remove this or risk form bot signups */

Intuit Mailchimp

(We don't spam or sell your email.)

Recent Posts

  • Safer, Healthier Breast Screening in Roanoke
  • Listen to Your Wife
  • First Time In My Life
  • Four-Season Gardening
  • Cry For Help

Categories

Tags

arm and hand numbness avocado recipe avocado smoothie back pain breastfeeding latching problems butternut squash recipe coconut oil collard greens recipe cultured vegetables daikon radish recipe difficult neck movement dill sauerkraut eggplant recipe foot pain GAPS friendly GAPS friendly recipe gentle chiropractic adjustments gluten-free gluten-free recipe headaches headaches and chiropractic healthy chicken salad herb tea high fructose corn syrup hip pain immune system support jaw pain knee pain knee pain and chiropractic low back pain low back pain and chiropractic migraines neck pain neck pain and chiropractic treatment pesto recipe raw fudge sciatica scoliosis separated shoulder and chiropractic shoulder injury shoulder pain shoulder pain and chiropractic sweet potato soup vegetable juice weight loss

Good Nutrition

Warming Broth for a Cold

When you're feeling down with a cold, the last thing you may want to do is cook!  Well, if you keep a few ingredients on hand you can make this nourishing, soothing broth in a few minutes.  If you … [Read More...]

  • Oatmeal is Back
  • Ginger Punch with a Kick
  • Polenta

Children’s Adjustments

Children's chiropractic adjustment at Towers Chiropractic

Children with back pain

Children suffer injuries that lead to misalignments just as adults do. Children generally respond very well and quickly to gentle chiropractic adjustments. A case in point is that of a 5 year-old … [Read More...]

  • Adjusting Children

Towers Family Chiropractic

2302 Colonial Ave, SW, Ste A
Roanoke, VA 24015
(540) 343-6636

Our hours are:
Monday, Wednesday, Friday:
10:00am – 1:00pm and 2:00pm – 6:00pm
Tuesday, Thursday:
7:30am – 11:30am and 12:30pm – 4:00pm
Saturday:
9:00am – 12:00pm

These statements have not been evaluated by the Food and Drug Administration. The information on this website is not intended to treat, diagnose, prevent, or cure any disease.

Copyright © 2025 · Towers Family Chiropractic by Soupbone Creative