Towers Family Chiropractor

Helping You to Better Health Naturally

  • Home
  • About Us
  • Our Chiropractic Services
    • Chiropractic Care
    • Acupuncture
    • Nutrition Services
  • Helpful Videos
    • Posture Screening for Scoliosis and Posture Imbalances
    • Spinal Exercises
  • Patient Forms
  • FAQ
  • Contact Us
  • Chiropractic Solutions
  • Children’s Adjustments
  • Monica’s Recipes
  • Nutrition News
  • Healthy Habits
  • Patient Testimonials

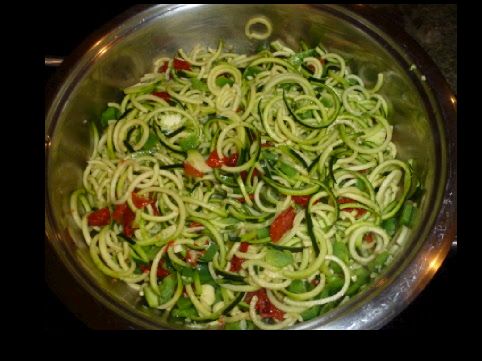
Zucchini “Noodles”

September 15, 2014 by towers

This is a good vegetable substitute for pasta.  Easy, fast, and NOT HEAVY on the stomach.  If you don’t have a vegetable spiralizer (I have a Paderno that works great), you can use a dual julienne or vegetable peeler.  This is an inexpensive peeler that also has a blade for julienne cuts.  Make this dish as spicy or filling as you want by garnishing with any combination of:  red pepper flakes, hot pepper sauce, avocado cubes, chopped olives, grated romano cheese, chopped sweet red pepper, or cooked white beans.

2 small-medium sized zucchini, spiralized

3 cloves garlic

2 Tbsp. olive oil or ghee (I used 1 T of each)

fresh basil, 2 Tbsp. chopped

2 tomatoes, chopped or 1/4 cup dried tomatoes, soaked in water to soften, chopped

1/2 c chopped shitake mushroom (optional)

salt, pepper to taste

Romano cheese, grated

Saute crushed garlic in olive oil or ghee.  As soon as the garlic starts to sizzle but before it browns, add the zucchini “noodles” keeping the heat at medium.  Stir for 2 minutes to evenly heat zucchini until  just tender (zucchini noodles will NOT be firm if you overcook at this step so undercook them).  Add chopped tomatoes and mushrooms, basil, salt and pepper.  Stir for a minute or so more to heat evenly.  Serve immediately with garnishes of your choice.

Filed Under: Monica's Recipes

Dill Garlic Pickles

August 27, 2014 by towers

We are STILL getting cucumbers from the garden–2014 is the year of the cucumber.   I’ve made the best of it and have been stocking up on sour (brine)  pickles.  They keep for months in the fridge and are a lot easier to make than any other pickle.  Plus they contain good bacteria for a healthy digestive system since they are fermented.  If you don’t have your own cukes, perhaps you can still get a deal on locally grown ones at farmers markets.  Young small pickling cukes that are not seedy are ideal–they will be firmer pickles.  Don’t use big, over-ripe cukes–you will be disappointed in the final product.  Also, if your room temperature is above 75 degrees F the pickles may be slimey or moldy and should be discarded so be sure you have a cool  place  for fermentation.

You will need a big glass jar with a wide mouth.  I have a gallon-sized jar with a 5- inch mouth that is perfect but two 1/2 gallon-sized wide-mouth canning jars (available at hardware stores) will work very well too.   You will also need a smaller jar that fits inside the mouth of the big jar to act as a weight for keeping the cukes down in the brine.  Remove all labels and wash all jars very well before making the pickles.  It’s taken me a while but I now have a collection of recycled glass jars  that fit very well into my wide-mouth canning jars.  Get your system down–you won’t regret it and you’ll be ready for next year’s cucumber crop!

For 1 gallon of pickles:

About 8-10 small cucumbers, washed well

3 sprigs of fresh dill or 2 Tbsp. dried dill weed

6 large cloves garlic

About 2 quarts of brine:  3 Tbsp. sea salt (I like Celtic) per quart of filtered water

Arrange as many of the cucumbers in the glass jar(s) as will fit so that they are packed but not squished together.  Also leave a space of at least 3 inches at the top of the jar.  I place them in vertically, side-by side and fit 2 layers of them in if the cukes are small enough.  Add the dill and garlic by pushing them down in the spaces between the cucumbers.  Dissolve (by stirring well) 3 Tbsp. of salt in a quart mason jar almost filled with water.  Pour this onto the cukes in the big jar.  Mix another quart of brine and add that –usually 2 quarts of brine is enough to completely submerge the cucumbers but if you need more mix it at that ratio.   Be sure to leave about 3 inches of space at the top of the jar.   Now fill your small glass jar with water, cap it and place it into the big jar–ideally it just fits in and acts as a weight that  submerges the cucumbers without spilling brine.  If you didn’t leave enough space at the top of the jar you will have trouble with brine overflowing.   Place in a 65-75 degree F room out of direct light.  Put a plate under the big jar just in case some brine spills over as the fermentation proceeds.  Also, cover the top with a dishcloth or cheese cloth to keep dust, etc. out.   Check every day to be sure the cukes stay submerged.  The pickles should bubble as they ferment and be soured through in 5-7 days (cut one open and see if it is dark green all the way to the center).  Remove cloth and the small jar and cap your big jar.  Keep in the refrigerator.


Filed Under: Monica's Recipes Tagged With: brine pickles, fermented cucumbers, sour dill pickles

Lime Pie

August 18, 2014 by towers

Avocado in a pie?  Strange to me at first too, but now I’m sold.  When you try this pie I bet you will agree.   Don’t worry, the pie doesn’t turn brown from the avocado oxidizing–the lime juice prevents that.  And it’s easy–no baking, and with a food processor it’s quick.  (You will need a food processor and blender for this recipe) I found the original recipe in the GAPS cookbook “Internal Bliss” which is a gluten-free recipe book, but I replaced the nuts with seeds and dried coconut because that’s what I had!  Also, I believe it to be easier to digest with these changes.  The ghee adds a nice butterscotch-like flavor but coconut oil alone works too if you want it dairy-free.

Serves 6

Pie Crust

1/2 cup pumpkin seeds

3/4 cup sunflower seeds

1 cup dried shredded coconut

6 pitted dates, cut in half

1/2 tsp. vanilla extract

pinch of sea salt

1 Tbsp. ghee or coconut oil


Filling:

1/2 to 3/4 cup lime juice

1/2 cup honey

1/4 cup coconut milk

1 cup avocado (about 1 avocado)

2 tsp. vanilla extract

pinch sea salt

1/4 cup ghee (or coconut oil)

1/4 cup coconut oil

When I made this recipe I used “crispy” sunflower and pumpkin seeds which I try to keep on hand.  This means I soaked them in water overnight, rinsed them well the next day, drained and salted them, and then dried them in a 200 degree F oven for about 2 hours with an occasional stir. Why?  Because this preparation reduces the anti-nutrient levels in nuts and seeds and makes them easier to digest.  You can skip this step and use plain dried seeds (NOT the roasted, oiled ones as the oils used are mostly unhealthy).

Put the seeds in the food processor and grind.  In a blender, blend the dried coconut  to a fine powder.   Add the coconut “flour” to the ground seed mixture in the processor.  Add the rest of the crust ingredients and process well.  Press this mixture into a pie dish.

Place all filling ingredients except the ghee and coconut oil in the food processor.  Blend until smooth and creamy.  I used 1/2 cup lime juice which was 2 limes.  If you want intense lime flavor you may want to use 3/4 cup as the original recipe called for.  If you use 3/4 cup lime juice, be sure to taste it after it’s all blended and add more honey if it’s not sweet enough for you.  Now melt the coconut oil over low heat if it is not already melted (which depends on the temperature of your kitchen).  Add the ghee if you are using it and continue warming until it also melts.  Drizzle this mixture into the food processor while it’s running.  Process until smooth and creamy.  Pour into piecrust.  Freeze for 3 hours.  Remove from freezer 30 before serving for easy cutting.  Store in freezer.


Filed Under: Monica's Recipes Tagged With: dairy-free and gluten-free dessert, dairy-free and gluten-free key lime pie, gluten-free dessert, gluten-free key lime pie, lime pie, no-bake key lime pie

Roasted Chicken and Chicken Broth

August 12, 2014 by towers

For very tender chicken that is still nicely browned, try this recipe. The chicken is slowly roasted in a 250 degree F. oven.  If you have a pyrex baking dish with a glass lid, the glass lid keeps the moisture in but allows browning of the skin. Otherwise, you can use a regular baking pan and baste as necessary.  Another option that yields meat broth also is to cook the chicken on the stovetop in a soup pot—use the same ingredients but follow the directions at the bottom of the page*.  The bonus when you cook a whole chicken is that nourishing, gelatin-rich bone broth can be made after the meat is removed. If the chicken was a pasture-raised healthy bird, the fat that is in the broth will be healthy fat and should not be skimmed off.

1 whole chicken preferably pasture-raised, completely thawed and rinsed well

6 or so 8-inch long rosemary sprigs

1 medium onion, quartered

3 cloves of garlic

2 stalk celery, cut in 4- inch long pieces

olive oil

sea salt

freshly-ground black pepper

2 Tbsp. red wine or balsamic vinegar

Preheat oven to 250 degree F. Oil the bottom of the baking dish with a Tbsp. of olive oil. Place chicken in the dish and rub all over with a little of this olive oil. If organs came with the chicken, they can be placed in the bottom of the dish. Stuff the rosemary sprigs, onion pieces, garlic cloves, and celery pieces into the cavity of the chicken. Spoon into the cavity the wine or vinegar.  Season skin with salt and pepper. Roast for 4-6 hours until internal temperature is greater than 165 degrees F, the chicken is nicely browned, and the meat falls off the bones.  Lift the chicken out carefully and place on a serving dish.  Discard the vegetables and herbs inside but do not discard any chicken parts (bones, skin or organs) as they will be used for the bone broth.  Save the juice in the bottom of the baking dish (which is called meat broth) for serving over the chicken or  keep it to use as stock for soups.

To make the bone  broth, add all the bones, leftover skin, and all the scraps that are leftover from the chicken. Add plenty of water to cover.  It is optional but to make the broth more flavorful you can add 1 celery stalk and more garlic and onion, plus more rosemary sprigs.  Bring almost to a boil and reduce heat immediately to a slow simmer. (Do not boil the broth for the best flavor.)  Add 2 Tbsp. of wine or balsamic vinegar. Cover but leave the lid opened a crack. Can be left overnight on very low heat but should simmer at least 8 hours. Strain the broth and discard the chicken parts, and vegetables.  Refrigerate or freeze the broth—pint sized plastic containers work well.  The broth will last about 1 week in the refrigerator.  Use in soups, stews, gravies, or for cooking grains.

*For stovetop cooking, place the chicken and all other ingredients except the wine or vinegar in a soup pot.  Add just enough water to cover the chicken.  Bring to a boil and immediately lower heat to maintain a simmer.   Cover with the lid cracked a little.  Check periodically to be sure it’s not boiling but just simmering, and add a little water if necessary to keep the chicken covered.  After about 3 hours the meat should be falling off the bones.  Check with a thermometer and be sure the temperature of the meat is over 165 degrees F.  Remove the chicken to a serving plate.  Strain and save the cooking water (discard the vegetables and herbs)—this is called meat broth and is very nutritious and flavorful.  It can be used just like the bone broth described above.  Now you can follow the directions above to make the bone broth.

Filed Under: Monica's Recipes Tagged With: chicken bone broth, chicken broth, homemade chicken broth, roasted chicken

Onion Soup

August 11, 2014 by towers

Why make soup in the summer?  When it’s rainy I love warm soup–and it’s been raining for days as I post this.  Another reason is that I’m trying to use up onions that are not good keepers.  Every year I grow Walla Walla onions which are sweet, white, and grow to a large size.  They don’t store well so I use them–especially the imperfect ones–as quickly as I can.  This is a quick, light soup with few ingredients but be sure to use chicken broth made the old fashioned way (rich in gelatin and flavor).

2 large onions (if you can get sweet onions fine but ok to use yellow ones)

2 Tbsp. butter or ghee

2 Tbsp. extra virgin olive oil

2 cups chicken broth

1 cup tomato juice

sea salt and black pepper to taste

pecorino or parmesan cheese, optional

Peel the onions and cut in half and then in quarters.  Place cut side of each onion quarter down and slice into 1/4 inch pieces.  Melt butter in soup pot over medium heat.  Add olive oil and stir.  Add onion and 1/2 tsp. sea salt.  Keep heat at a medium setting but stir onions frequently so they don’t burn, just brown.  It will take about 10 minutes or so for them to brown or carmelize. Add chicken broth and tomato juice.  Bring to a simmer and reduce heat to low and simmer for 10 minutes.  Serve with grated cheese if desired.

Filed Under: Monica's Recipes Tagged With: carmelized onion, onion soup, Walla Walla onion recipe

Need a good garlic press?

July 28, 2014 by towers

I’ve been putting up with a mediocre garlic press for years.  I heard a chef’s review on the Kuhn Rikon Epicurean Garlic Press and decided it was worth the $40 investment because I use a fair amount of fresh garlic in my kitchen.  It is SO MUCH EASIER to squeeze than my old one, plus you can fit more garlic in it. They say 60% less effort is needed.  Also, it’s stainless steel and easy to clean.   If you’ve gone without or have been struggling with your garlic press, you know what to ask for on your next birthday!

Filed Under: Monica's Recipes Tagged With: easy to squeeze garlic press, garlic press

Roasted Eggplant

July 23, 2014 by towers

For this recipe I used Japanese eggplants which are long and not more than a few inches in diameter.  Their skins are not as tough and they are not as seedy as regular eggplants.  I grow them in my garden but they are sometimes available at farmers markets or at the Roanoke Natural Foods Co-op.  If you can get them, give this easy recipe a try.

2 Japanese eggplants

3 Tbsp. extra virgin olive oil

sea salt

black pepper

Cut off the stems and ends of the eggplants and then cut them into 1/2 inch cubes (no need to skin them).  Place in a baking pan and toss with the olive oil until well coated.  The eggplant tends to absorb the oil so drizzle it over while stirring to evenly coat the eggplant and use more olive oil if you like.  Add salt and pepper and stir again. Spread cubes evenly over the pan.   Bake in a 400 degree F oven for about 20 minutes turning once with a spatula at about 10 minutes to brown evenly.  Serve hot and consider garnishing with the dry pesto mix  I’ve posted previously in a green bean recipe–just sprinkle the mix over the eggplants cubes as you serve them  .  Serves 2-3.

Filed Under: Monica's Recipes Tagged With: eggplant recipe, Japanese eggplant recipe, pesto recipe, roasted eggplant recipe

Coconut Chocolate Ice Cream

July 15, 2014 by towers

If you are a coconut lover or are dairy-free and would like some ice cream on occasion this recipe is for you!  It is adapted from a recipe I found in Bruce Fife’s Coconut Lover’s Cookbook.  The good part is that there is no cooking and the ingredients remain raw (except the coconut milk which is canned).  Use the best quality ingredients so that the finished product is as good for you as it is good tasting.  The ghee adds a buttery flavor to the ice cream but you can use just coconut oil.  For variety, replace the cocoa powder with 1 cup of frozen fruit or berries that you have pulverized in a food processor and that you stir into the mixture last right before freezing it (the frozen fruit puree will make your ice cream freeze faster.)  Also, you may decrease the amount of honey by half and add some stevia to taste.  You will need an ice cream maker or you could make popsicles instead.

2 Tbsp. of raw, organic coconut oil, melted

2 Tbsp. ghee or 2 more Tbsp. of coconut oil, melted

3 Tbsp. raw, organic cocoa powder

1 can of classic (not lite) organic coconut milk (13.5 fl. ounces)

pinch of sea salt

1/3 cup of honey

1 Tbsp. vanilla extract

Warm coconut oil and ghee if they are not already melted by placing in a small bowl and placing the bowl in enough hot water to melt the coconut oil.  Stir the cocoa powder into the melted coconut/ghee oil.

In a food processor or blender place the coconut milk, vanilla, honey, and salt.  Blend well.  Add cocoa mixture and blend again.  Freeze according to your ice cream maker’s instructions.

Serves 4.


Filed Under: Monica's Recipes Tagged With: chocolate coconut ice cream, coconut ice cream, dairy-free homemade ice cream, homemade coconut milk ice cream

Eggplant Dip

May 29, 2014 by towers

This recipe is a variation of Baba Ganouj without the tahini (sesame butter) .  I don’t normally buy tahini  because I rarely use it, so when I had an eggplant that needed to be eaten I experimented by making this dip with ground sesame seeds and sesame oil, and leaving the tahini out.   I believe I like it better without the tahini!  The dip is such an easy way to prepare eggplant and it will keep in the fridge a few days.  Serve with vegetable sticks or a salad or  spread on crackers or bread or on GF sprouted corn tortillas that Food For Life makes and which can be found in the freezer section of health food stores.

2 medium eggplants (buy younger, thinner ones because the seeds are not as developed– you don’t want the seeds)

2 cloves garlic

juice of 1 lemon

1/3 cup extra-virgin olive oil (optional: replace half of the olive with organic cold-pressed sesame oil)

1/2 cup ground sesame seeds (I prefer the hulled “white” sesame seeds and I grind them in a blenderbefore mixing them with other ingredients)

salt, pepper, and cayenne to taste

Puncture the eggplants in a few places and bake at 350 degrees F for about 1 hour or until eggplants are very tender and wrinkled but not burnt.  Let cool.  Cut in half and slip off the skin and remove the seeds–they come in “packs” and should scoop out with a spoon readily if the eggplant is well cooked.  Place the “meat” of the eggplants ( this step is a little messy but you need to trust and persevere and don’t be afraid to use your hands) in a food processor with the rest of the ingredients and process until smooth.  Taste and correct seasonings.  Keep in the refrigerator.


Filed Under: Monica's Recipes Tagged With: eggplant dip, eggplant recipe

Spicy Sauerkraut

May 11, 2014 by towers

Every few weeks I make a batch of cultured veggies using a different mix of organic vegetables.  The base is either finely shredded cabbage (green or Chinese) or zucchini.  To this I’ll add  a mix of fresh, organic veggies available in the stores.  Once the garden starts producing there will be more fresh stuff to choose from.  For the last batch I had scallions from the garden.  For spice I added red pepper flakes.  The cuke and daikon radish were cut lengthwise and then into 1/4 inch slices in hopes they would retain crispness once the cabbage was fully fermented– I try to avoid letting the veggies ferment to the point of being uniformly soggy. I tasted it every day and after 1 week the result was a nice variety of texture and flavor.  Give it a try!

1 head of green cabbage, shredded by hand or food processer

1 large daikon radish, cut lengthwise and then into 1/4 inch slices

1 cucumber cut like the radish

1/2 sweet red pepper, finely chopped

3 scallions, chopped

3-5 cloves of garlic, crushed

1 to 1 1/2 Tbsp. sea salt

1/2 to 1 tsp red pepper flakes

Mix all ingredients very well in a large bowl.  Let sit for 15 minutes to allow the salt to work and release the juices.  Pack into a 1/2 gallon mason jar.   There should be at least 3 inches of space at the top of the jar so the juices don’t overflow as the fermentation progresses.  Using a large spoon press the vegetables down into their juice.  You may need to continue to press to release more juice.  Now add a weight to keep the vegetables submerged.  For the weight I use another smaller glass jar.  Inside this glass jar and on top of the mixture, place another smaller glass jar that fits inside easily.  Fill the smaller jar with water to act as a weight that will keep the vegetables submerged in the juice.  This protects them from molding.   Don’t add water–there should be plenty of juice from the vegetables to cover.  Place a towel or cheesecloth over the whole thing and then a rubberband around the neck of the large jar.  Leave on your counter but out of the sun.  The temperature should be 65 to 70 degrees F.  Press the small jar down every day to release gas bubbles.  Taste every day and refrigerate as soon as the texture is appealing–this should be in 5-7 days.

Filed Under: Monica's Recipes Tagged With: cultured vegetables, fermented vegetables, spicy sauerkraut

« Previous Page
Next Page »

Subscribe to get our Blog posts in your email.

* indicates required
/* real people should not fill this in and expect good things - do not remove this or risk form bot signups */

Intuit Mailchimp

(We don't spam or sell your email.)

Recent Posts

  • Safer, Healthier Breast Screening in Roanoke
  • Listen to Your Wife
  • First Time In My Life
  • Four-Season Gardening
  • Cry For Help

Categories

Tags

arm and hand numbness avocado recipe avocado smoothie back pain breastfeeding latching problems butternut squash recipe coconut oil collard greens recipe cultured vegetables daikon radish recipe difficult neck movement dill sauerkraut eggplant recipe foot pain GAPS friendly GAPS friendly recipe gentle chiropractic adjustments gluten-free gluten-free recipe headaches headaches and chiropractic healthy chicken salad herb tea high fructose corn syrup hip pain immune system support jaw pain knee pain knee pain and chiropractic low back pain low back pain and chiropractic migraines neck pain neck pain and chiropractic treatment pesto recipe raw fudge sciatica scoliosis separated shoulder and chiropractic shoulder injury shoulder pain shoulder pain and chiropractic sweet potato soup vegetable juice weight loss

Good Nutrition

Warming Broth for a Cold

When you're feeling down with a cold, the last thing you may want to do is cook!  Well, if you keep a few ingredients on hand you can make this nourishing, soothing broth in a few minutes.  If you … [Read More...]

  • Oatmeal is Back
  • Ginger Punch with a Kick
  • Polenta

Children’s Adjustments

Children's chiropractic adjustment at Towers Chiropractic

Children with back pain

Children suffer injuries that lead to misalignments just as adults do. Children generally respond very well and quickly to gentle chiropractic adjustments. A case in point is that of a 5 year-old … [Read More...]

  • Adjusting Children

Towers Family Chiropractic

2302 Colonial Ave, SW, Ste A
Roanoke, VA 24015
(540) 343-6636

Our hours are:
Monday, Wednesday, Friday:
10:00am – 1:00pm and 2:00pm – 6:00pm
Tuesday, Thursday:
7:30am – 11:30am and 12:30pm – 4:00pm
Saturday:
9:00am – 12:00pm

These statements have not been evaluated by the Food and Drug Administration. The information on this website is not intended to treat, diagnose, prevent, or cure any disease.

Copyright © 2025 · Towers Family Chiropractic by Soupbone Creative