Towers Family Chiropractor

Helping You to Better Health Naturally

  • Home
  • About Us
  • Our Chiropractic Services
    • Chiropractic Care
    • Acupuncture
    • Nutrition Services
  • Helpful Videos
    • Posture Screening for Scoliosis and Posture Imbalances
    • Spinal Exercises
  • Patient Forms
  • FAQ
  • Contact Us
  • Chiropractic Solutions
  • Children’s Adjustments
  • Monica’s Recipes
  • Nutrition News
  • Healthy Habits
  • Patient Testimonials

Radicchio Salad

October 10, 2012 by towers

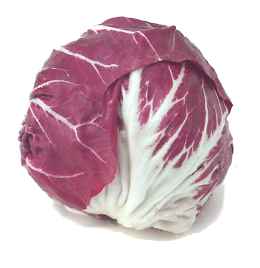
Ever wonder what that red and white-headed, lettuce-like vegetable  is in the produce section?  It’s not red cabbage; it’s in the chicory family so it’s technically not a lettuce either.  It’s called radicchio and it’s delicious!  It does have a bitter taste but if it’s balanced in a salad with milder tasting things it won’t be overpowering.  Give it a try!

RADICCHIO SALAD

2 cups coarsely chopped radicchio

1 medium avocado, peeled, pitted, and cubed

1/2 cup zucchini relish (see recipe below) or use grated zucchini

10 green olives, pitted and sliced

1/4 cup feta cheese (optional)

2 Tbsp. extra-virgin olive oil

freshly-ground black pepper to taste (optional)

Mix all ingredients in a salad bowl except oil.  Add oil and mix well.  If you used grated zucchini instead of zucchini relish, add 1 Tbsp. fresh lemon juice and salt to taste.  Serves 4.

Filed Under: Monica's Recipes Tagged With: avocado, GAPS friendly, gluten-free, radicchio, radicchio salad, salad recipe

Green Beans with Pesto

September 14, 2012 by towers

Traditionally pesto is served with pasta or bread.  If you are avoiding wheat or flour products, pesto can still be very much enjoyed.  Pesto is a condiment of sorts made with fresh leaves of the kitchen herb, sweet basil.  There are various recipes out there–this one is simple and uses sunflower seeds instead of pine nuts but you could use pine nuts or almonds or walnuts if you prefer.  Also, no olive oil or butter are used in the pesto so that the mixture remains somewhat crumbly and mixes easily with vegetables or sprinkles readily on top of vegetables or fish or eggs or millet grits.  The butter or olive oil–you can also use ghee– can be added separately as you will see in this recipe.  You will need a food processor for this recipe.

If you want to add some other vegetables to the green beans, 1/2 cup chopped sweet onion and a small zucchini cut in cubes work great.  I’ve also added any or all of the following:  a chopped tomato, 1/2 cup chopped sweet red pepper, 1/4 cup crumbled feta cheese.. Don’t cook any of these though.  Add them to the beans after the butter or ghee has been added to the beans and is melted..

Pesto

1/2 cup raw, unsalted sunflower seeds, pine nuts, or other nuts

1 and 1/2 cups fresh basil leaves

1 large clove garlic, crushed or chopped coarsely

optional:  1/3 cup grated pecorino romano cheese (parmesan is ok too).  1 Tsp. nutritional yeast flakes can be substituted for cheese.

Process the sunflower seeds or nuts until ground fine.  Add the basil leaves and process until the leaves are ground in with the seeds.  Add garlic and process again.  Add grated cheese or yeast and process until all is thoroughly blended.

Green Beans

3 cups cut green beans

1 or 2 Tbsp. butter, or ghee, or olive oil

Steam 3 cups of cut green beans (fresh or frozen) until just tender and still bright green.  Place in a serving bowl and immediately add  butter, ghee, or olive oil and stir until mixed well.   If you are adding any other vegetables as mentioned above, add them now.  Add pesto mixture and stir well.  Serve warm or cold.


Filed Under: Monica's Recipes Tagged With: GAPS friendly recipe, gluten-free, green beans with pesto

Cultured Zucchini Relish

August 17, 2012 by towers

This lacto-fermented vegetable recipe appeared in Wise Traditions,, Fall 2011.  Lacto-fermented vegetable recipes often are cabbage-based– this one is not and  is a refreshing change as well as being easier to make.  I made a few changes to the original recipe after experimenting with it.  Besides being delicious–especially on salads, hot dogs, egg dishes, and with cheese–it is full of probiotics which are very healing to the digestive system.  Unlike other relishes, the ingredients are never cooked thus preserving nutrient levels and enzymes.  The fermentation process makes the raw ingredients very easy to digest–be sure not to heat it!   It will keep in the refrigerator for weeks.


Zucchini Relish

2 medium small zucchini, grated

1 medium carrot, grated

1/2 sweet red pepper, chopped fine

1 medium-sized red onion, chopped fine

1 daikon radish, halved lengthwise and then chopped in 1/8 inch slices, optional OR 1 cucumber, chopped

1 large clove garlic, crushed

1 Tbsp. sea salt (I prefer Lima)

1 grape or oak leaf to maintain crispness (optional)

herbs of your choice are optional–1 tsp. dill weed and 1 tsp ground or whole caraway seeds are my favorite addition

Mix all ingredients except the leaf in a bowl.  Let sit 5 minutes.

Place the leaf in the bottom of a glass quart-sized or 1/2 gallon-sized mason jar (wide-mouth jar is best so that the weight fits in).  Spoon vegetable mix into the jar and be sure to pour all liquid into the jar also.  Press the vegetables for 5 minutes or so by pressing down with a spoon to assist with release of liquid from the vegetables; this step is not always necessary as long as there is enough liquid to cover the vegetables in the jar.  Be sure to leave at least 2 inches of air space at the top of the jar so that as the veggies ferment and bubble out gases the liquid doesn’t overflow the jar.  For the weight that keeps the vegetables submerged in the liquid, use another smaller jar that fits inside the quart mason jar–any size that fits inside the mason jar is ok as long as it is tall enough for easy removal.  You can fill the smaller jar with water so that is heavier.  Press it down once or twice a day to assist with release of gas bubbles.

Put  a towel or cheese cloth held in place with a rubberband over the top.  Leave at room temperature for 2-3 days.  Depending on how warm it is, the fermentation time will vary so taste the mixture every day.  Keep refrigerated when you are ready to stop fermentation.  If you prefer a crisp texture, refrigerate after 2 days.  Also, consider adding the  chopped cucumber after the fermentation of the other ingredients and right before you refrigerate so that the cucumbers will be crisp.  Lots of options!  Just be sure you get lots of fermentation bubbles  going (indicating the growth of probiotic bacteria) before you refrigerate.


Filed Under: Monica's Recipes Tagged With: cultured vegetables, enzyme-rich food, GAPS friendly, gluten-free, lacto-fermented zucchini relish, probiotic-rich food

Mostly Fruit Popsicles

May 17, 2012 by towers

2 cups frozen berries (or mango or banana slices)

½ cup whipping cream or yogurt or coconut milk

2 Tbsp. honey

1 tsp. vanilla extract

stevia extract to taste if not sweet enough


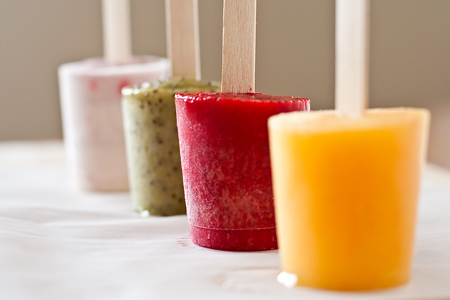
Pulverize frozen fruit in a food processor.  In a separate bowl, whip cream.  Stir honey and vanilla into whipped cream, OR yogurt or coconut milk depending on which you use.  Mix well.  Stir in frozen pulverized fruit.  Taste and add stevia if desired.  Place in popsicle molds or cups.  Freeze.  Makes 4 servings.  Run water over mold to loosen and remove.

Filed Under: Monica's Recipes Tagged With: fruit popsicles, healthy popsicles, homemade popsicles

Savory Wild Rice

April 30, 2012 by towers

Lundberg wild rice blend is sold at the Roanoke Natural Foods Co-op and though more expensive than regular brown rice is much more flavorful.  Another secret here is carmelizing the onions.  Enjoy!

1 cup wild rice blend

1-2 Tbsp. butter or ghee–can substitute with olive oil

2 Tbsp. extra-virgin olive oil

1/2 cup chopped onion

2 Tbsp. fresh chopped oregano or 1 tsp dried orgenao

1/4 cup chopped green olives

salt, pepper, and tamari to taste

Place rice in a sauce pan and rinse well in plenty of water.  Drain all the water off with a stainer.  Pour 1 and 1/2 cups of boiling water into the saucepan.  Place lid on the pan and simmer on low heat until rice is tender and all the water is absorbed.

While the rice is cooking, carmelize the onions.  Melt the butter in a skillet and add the olive oil.  As soon as the oil is hot (but not burning!) add the chopped onions.  Stir well to coat the onions with oil.  Add a 1/2 tsp. of sea salt.  Continue to stir over med. heat until onions are soft and browned and excess moisture has evaporated–this may take 10 minutes or more.  Add the oregano, olives, and stir a few minutes more.  Add cooked rice and fluff up with a fork to mix well.  Season with tamari, salt and black pepper.  Serves 3-4.

Filed Under: Monica's Recipes Tagged With: carmelized onion, fresh oregano, wild rice recipe

Omelet with Feta and Zucchini

April 4, 2012 by towers

Eggs from pasture-raised healthy chickens are a very good source of protein.  Omelets are easy and can be served for breakfast, lunch or dinner.  This one  is a meal in itself (the leftover wild rice is unusual for an omelet but very tasty with a nice texture) if served with a salad.  Add some vegetable juice and you have an excellent meal that is nutrient dense but not high in carbs—great for weight loss!

1/2 red onion, chopped

1 Tbsp. ghee

1 small zucchini, chopped

4 eggs, beaten

1 cup leftover wild rice

2 tsp. dried basil or 2 Tbsp. fresh chopped very fine

1/3 cup crumbled feta cheese (can be goat or sheep milk feta)

1/2 tsp. salt and black pepper to taste

hot pepper sauce to garnish, optional

In a 10-inch skillet saute the onions in ghee over medium heat about 5 minutes.  Add the zucchini and cook another 5 minutes.  Stir as needed to prevent sticking.  Add the cooked rice, basil, salt and pepper, and stir.  After a few minutes pour the beaten eggs slowly into the skillet.  Sprinkle the feta cheese evenly over the omelet.  Cover with a lid and cook over low to med. low heat until just set.  Do not overcook–eggs are easier to digest when lightly cooked.  Serve warm.  Serves 2.

Filed Under: Monica's Recipes Tagged With: eggs from pasture raised chickens, feta cheese, omelet, weight loss recipe

Cranberry Drink

November 18, 2011 by towers

This festive CRANBERRY DRINK has many merits! It is unusual in that the cranberries and oranges are not cooked or heated in any way; the nutrient levels are maintained better when a food is not heated. It has peppermint tea which aids digestion. It is not high in sugar since stevia is used to sweeten and the natural fruit sugar in the orange juice is diluted by the tea and cranberry juice. Many people do not realize that cranberries are very sour alone so that products made with them (besides being heated) are very high in added sugar. This drink is a refreshingly low-sugar way to enjoy the health benefits of cranberries. One other benefit—being a fluid it contributes to your 8 or so cups of recommended fluids a day.

RAW CRANBERRY ORANGE DRINK

1 12 oz. Bag fresh cranberries, organic is best

8 organic juicing oranges

3 peppermint tea bags

2-3 cups water

stevia extract to taste

This beverage can be made with a blender or a vegetable juicer. It is also helpful to have a citrus juicer.

Boil the water and pour into a glass quart jar or a teapot and add 3 peppermint tea bags or 3 Tbsp. of the dried herb. Let steep until cooled to room temperature.

Wash cranberries and drain. If you are using a vegetable juicer, put them through a vegetable juicer and set aside the juice. If using a blender place the cranberries into a blender. Add the tea to the blender and blend very well. Strain mixture through a strainer into a glass bowl and press pulp with a spoon until most of juice is removed. Discard pulp or put it into homemade  cranberry sauce.

Juice oranges. Mix orange juice, cranberry juice, and tea if you used a vegetable juicer to extract the cranberry juice, in a pitcher. Add stevia to sweeten to taste. Enjoy!

Filed Under: Monica's Recipes Tagged With: cranberry, cranberry drink, GAPS friendly, holiday cranberry drink, raw cranberry recipe

Celeriac Soup

October 19, 2011 by towers

Celeriac Soup Recipe

Celeriac root is an unusual vegetable related to celery that has a fantastic flavor.  If you can’t find it, 4 stalks of celery can be substituted.  The vegetable stock can be made concurrently with the onion, the leek trimmings, the potato and celeriac peelings, plus a bay leaf.  Remember to slit the leek with a knife lengthwise from about 3 inches from the root end all the way through the remainder of the leek so you can wash all the dirt out. Also, this can be made dairy-free and still be quite good.  Just add 2 Tbsp. of mellow white miso right before serving and blend well.

1 celeriac root (5 inches in diameter)

4 cups vegetable stock

1 bay leaf

1 onion

1 leek

4 small white potatoes

2 Tbsp. butter

1/3 cup cream or plain yogurt

4-5 sprigs of fresh basil and parley each

Wash and trim the leek well–usually only about 6-8 inches of the white part of the root end of the leek is used and the rest trimmed off.  Place the trimmings in a sauce pan with 5 cups of water, the bay leaf, and the onion (cut in half ) and bring to a boil.  Turn heat to medium low and cover.  Wash and skin the celeriac root and potatoes.  Place the peels in the water also and continue to simmer with the lid on.  Simmer for 45 minutes.  Continue preparing the remaining ingredients while the stock cooks.

Chop the leek and potatoes.  Grate the celeriac root.   Saute the leek in the melted butter in another sauce pan for 5 minutes stirring occasionally.  Add the potatoes and grated celeriac root.  Saute 5 minutes more.  Add the stock and bring to a boil and immediately reduce heat to a simmer and cover for 45 minutes or until vegetables are soft.  Blend with a hand-held blender until smooth. (You can also transfer to a blender and blend.)   Add cream or yogurt, salt and pepper to taste, and the chopped herbs.  Serves 4-6.

Filed Under: Monica's Recipes Tagged With: celeriac soup, leek recipe, soup recipe

Blueberry Squares

March 31, 2011 by towers

When you want something sweet, make it yourself but be sure to use the best quality ingredients.   The cost and the time involved may deter you from having desserts more than once or twice a week, which is a good thing!

The Roanoke Natural Foods Coop is  where we buy good eggs and other organic foods–especially bulk grains, beans, and herbs.  As for blueberries, we keep them in the freezer all year–we pick enough locally in early August to have them last all year long and they are easy to freeze.  This recipe has blueberries, rolled oats, arrowroot, and walnuts–all excellent ingredients.

1 cup organic rolled oats

3 Tbsp. organic butter (organic coconut oil may be substituted)

1 egg, organic and from pasture-raised chickens

1/4 cup honey

1 tsp. vanilla extract

1/2 tsp. aluminum-free baking powder

1/4 cup arrowroot powder

1/2 cup chopped walnuts

1 cup blueberries, fresh or frozen

Place the oats in a food processor and process into a coarse flour.  Cut butter into 1/2 inch pieces and blend into oats until mixture is homogeneous.  Add egg, honey, vanilla, and baking powder and blend well.  Add arrowroot flour and blend again.  Hand stir the walnuts into this mixture and spread into a pyrex baking dish (10-inch diameter or 8-inch square).  Spread the blueberries evenly on top and press them down into the batter–it’s ok if they are frozen but it may take a little longer to bake.  Bake for about 15 minutes in a pre-heated 325 degree F. oven until just golden and a knife poked in the center comes out clean.  Do not overbake or the squares will be dry.  Let cool and cut into squares.  Serves 4.

Filed Under: Monica's Recipes Tagged With: arrowroot powder, blueberries, healthy desserts

Honeyed Parsnips

March 21, 2011 by towers

As a gardening side note, we let the parsnips we planted last year in the garden overwinter so that they would be ready to dig once the ground thawed in the Spring.  It’s nice to have something to harvest this early in the year and it is said that the winter freezing sweetens them.  Leeks overwinter well also.  I mention this because many gardeners don’t take advantage of Fall gardening and they are missing out on so much!

This recipe is a delicious way to enjoy an unusual root vegetable.

Honeyed Parsnips

2 parsnips (1 medium sized parsnip per serving)

2 Tbsp. organic butter

2 tsp. honey

cinnamon or cardamon (optional)

Wash the parsnips well and peel if skins are tough or they are difficult to clean. Slice them into thin rounds no more than 1/8 inch thick. Melt butter in a skillet on medium-low heat. Do not burn—add the parsnips as soon as the butter melts and stir well to coat with butter. Cover the pan and let the parsnips brown for a few minutes. Use a spatula to loosen and flip them every 3-4 minutes, keeping them covered in between flipping. Again, do not let them burn. They should be tender in the middle, lightly browned and slightly crispy in about 15 minutes. Serve immediately. Place on serving dishes and drizzle with honey. Sprinkle with spice of your choice if desired.

Filed Under: Monica's Recipes Tagged With: parsnip recipe

« Previous Page
Next Page »

Subscribe to get our Blog posts in your email.

* indicates required
/* real people should not fill this in and expect good things - do not remove this or risk form bot signups */

Intuit Mailchimp

(We don't spam or sell your email.)

Recent Posts

  • Safer, Healthier Breast Screening in Roanoke
  • Listen to Your Wife
  • First Time In My Life
  • Four-Season Gardening
  • Cry For Help

Categories

Tags

arm and hand numbness avocado recipe avocado smoothie back pain breastfeeding latching problems butternut squash recipe coconut oil collard greens recipe cultured vegetables daikon radish recipe difficult neck movement dill sauerkraut eggplant recipe foot pain GAPS friendly GAPS friendly recipe gentle chiropractic adjustments gluten-free gluten-free recipe headaches headaches and chiropractic healthy chicken salad herb tea high fructose corn syrup hip pain immune system support jaw pain knee pain knee pain and chiropractic low back pain low back pain and chiropractic migraines neck pain neck pain and chiropractic treatment pesto recipe raw fudge sciatica scoliosis separated shoulder and chiropractic shoulder injury shoulder pain shoulder pain and chiropractic sweet potato soup vegetable juice weight loss

Good Nutrition

Warming Broth for a Cold

When you're feeling down with a cold, the last thing you may want to do is cook!  Well, if you keep a few ingredients on hand you can make this nourishing, soothing broth in a few minutes.  If you … [Read More...]

  • Oatmeal is Back
  • Ginger Punch with a Kick
  • Polenta

Children’s Adjustments

Children's chiropractic adjustment at Towers Chiropractic

Children with back pain

Children suffer injuries that lead to misalignments just as adults do. Children generally respond very well and quickly to gentle chiropractic adjustments. A case in point is that of a 5 year-old … [Read More...]

  • Adjusting Children

Towers Family Chiropractic

2302 Colonial Ave, SW, Ste A
Roanoke, VA 24015
(540) 343-6636

Our hours are:
Monday, Wednesday, Friday:
10:00am – 1:00pm and 2:00pm – 6:00pm
Tuesday, Thursday:
7:30am – 11:30am and 12:30pm – 4:00pm
Saturday:
9:00am – 12:00pm

These statements have not been evaluated by the Food and Drug Administration. The information on this website is not intended to treat, diagnose, prevent, or cure any disease.

Copyright © 2025 · Towers Family Chiropractic by Soupbone Creative