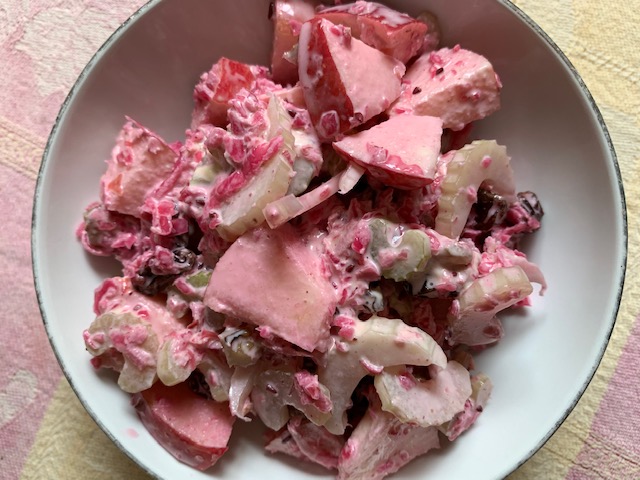
Towers Family Chiropractor

Helping You to Better Health Naturally

  • Home
  • About Us
  • Our Chiropractic Services
    • Chiropractic Care
    • Acupuncture
    • Nutrition Services
  • Helpful Videos
    • Posture Screening for Scoliosis and Posture Imbalances
    • Spinal Exercises
  • Patient Forms
  • FAQ
  • Contact Us
  • Chiropractic Solutions
  • Children’s Adjustments
  • Monica’s Recipes
  • Nutrition News
  • Healthy Habits
  • Patient Testimonials

Avocado Smoothie

September 30, 2015 by towers

We had an avocado smoothie at a natural foods co-op in Seattle and found it to be surprisingly delicious.  If you like avocado, give this a try and let me know what you think!  You will need a juicer and a blender.  If you prefer it sweeter either juice 2 apples or add a little stevia.

Serves 2

1 avocado

juice of 1 organic cucumber

juice of 1 organic apple

1 Tbsp. lime or lemon juice

pinch of sea salt

Cut the avocado in half and remove the pit.  Spoon the avocado into the blender container.  Juice the cucumber and the apple with an electric juicer.  Pour the juice into the blender container.  Add pinch of salt and lime juice.  Blend thoroughly. Pour 1/2 of the mixture into each of two glasses.   Serve immediately.


Filed Under: Monica's Recipes Tagged With: avocado recipe, avocado smoothie

Coconut “Granola”

September 28, 2015 by towers

I do not recommend granola since it is most often made with a lot of concentrated sugar of some sort and poor quality oil (remember any product made with non-organic soy or canola or corn–their oils too–is very likely made from genetically modified seed).  Also, the rolled oats in granola are high in phytate, a mineral binder that makes mineral absorption difficult for the gut. (A healthy way to have oatmeal is to soak rolled oats overnight, rinse and drain, and then cook in water for at least 20 minutes until creamy.)  Here is a healthy version of granola.

Coconut Granola

4 cups of dried organic coconut “chips”(if not available use the smaller flakes)

2 cups soaked walnut halves or 1 cup sunflower and 1 cup pumpkin seeds (soak the walnuts or seeds in plenty of water overnight-rinse very well and drain before use)

3 Tbsp. honey

1 tsp. vanilla extract

Optional:  raisins or other fried fruit chopped into small pieces.

Place all ingredients in a large bowl and stir well until mixture is homogenous.  Spread in a baking pan (about 9″ by 12”).  Bake at 250 degrees F  until light gold and dried.   This may take an hour or more depending on your oven.  Stir every 15 minutes so it browns evenly and doesn’t overbake on the sides or bottom.  You can also dry the mixture in a food dehydrator for “raw” granola.  Allow the granola to cool completely before storing in a glass jar.  Keep refrigerated.

Filed Under: Monica's Recipes Tagged With: GAPS friendly, gluten-free granola. low-sugar granola, healthy granola, raw granola

GF Flax Biscuits

July 16, 2015 by towers

You can have your biscuits and eat them too if they are made of quality ingredients such as what we have in this recipe.  These gluten-free biscuits won’t push your blood sugar level out of balance, won’t stress your anti-oxidant system with damaged oils, and won’t cause constipation from refined white wheat flour.   They are nutrient-dense and good for the gut, the brain and energy production.  I think they taste good too–let me know what you think.


12 small biscuits


1 cup organic dry shredded coconut

1/2 cup sunflower seeds, I use soaked dried sunflower seeds

1/4 cup pumpkin seeds, I use soaked dried pumpkin seeds

1/4 cup whole flax seed

1 large egg

1 heaping Tbsp. arrowroot powder

1 Tbsp. ghee or clarified butter, melted

1 tsp. baking powder

1/2 tsp. sea salt

Use a blender to pulverize the shredded coconut into a fine powder–it will be a bit oily but that’s ok.  If your food processor can do this step, use it.  My Tribest blender makes  better “flour” than my processor–it has a cup-size blender container that is very easy to use.  Place the ground coconut into the processor.  Now repeat with the flax seeds to finely grind them up too, and add them to the processor.  Next, add the sunflower and pumpkin seeds to the processor and pulse until all ingredients are well mixed.  Add the rest of the ingredients and process again until dough forms a ball in the processor. Use a tablespoon to spoon dough onto a baking pan (you should get about 12 round biscuits) and bake at 350 degrees F for 12-15 minutes  or until just golden brown.  Don’t overbake or they will be dry.  Serve with butter if desired.

Filed Under: Monica's Recipes Tagged With: flax biscuits, gluten-free biscuits, healthy biscuits

Chicken Salad w/ Zucchini Noodles

July 9, 2015 by towers

Here’s a light summer salad that can serve as a meal.  This recipe packs in a lot of health-promoting ingredients–coconut oil, cultured veggies (sauerkraut), avocado, pasture-raised chicken–and leaves out the stuff that  weighs us down–pasta and mayo made with refined oils.  And did I mention it’s fast to prepare?

You will need a vegetable spiralizer ( I have a Paderno) to make the zucchini noodles.  I’m hearing that children love making and eating these noodles so this is a very worthwhile investment if you don’t yet have one.

Serves 2

2 1/2 Tbsp. organic coconut oil, melted

1 Tbsp. yellow mustard

1 tsp. balsamic vinegar

1/2 tsp. sea salt

1 tsp. hot pepper sauce or 1/4 tsp. cayenne (optional)

1 Tbsp. finely chopped onion

1/4 to 1/2 cup sauerkraut (I used homemade spicy sauerkraut or you can buy it in the refrigerated section in a health food store preferably made with organic veggies. )

1 zucchini (about 2 inches in diameter and 8 inches long), spiralized

1 cup chopped, cooked chicken (I used leftover Roasted Chicken)

1 avocado pitted, skinned and cut into cubes

4 cups chopped romaine lettuce

For the dressing, mix the first 6 ingredients very well in a medium-sized bowl.  Add the sauerkraut and stir.  Spiralize the zucchini (be sure to slit it half way thru lengthwise before you spiralize so your “noodles” are not too long) and stir the “noodles” into the mixture until well-coated with the dressing.  Next add the chicken and avocado.   Place 2 cups of chopped romaine in each salad bowl.  Spoon 1/2 the “noodle” mixture on top of the lettuce in each bowl.  Serve immediately as the noodles do not remain crisp for long.

Filed Under: Monica's Recipes Tagged With: healthy chicken salad, mayo-free chicken salad recipe, spiralized zucchini recipe

Crispy Chickpeas

May 29, 2015 by towers

This recipe is my version of  “Crispy Spiced Chickpeas” from “The Complete Vegetarian Cookbook” from America’s Test Kitchen.  They use vegetable oil in many of their recipes (which is the main complaint I have about the book) so I replace it with the healthy, non-inflammatory oils–coconut oil or olive oil.  I rarely fry foods but on occasion when I do, I use coconut oil as it is not damaged by high heat–if you want less of a coconut flavor use a more refined coconut oil.  These chickpeas are a great snack food or crouton replacement on a salad.   We made a simple, light summer meal last night by serving a large salad with eggplant pate and these chickpeas.  They are particularly good warm so enjoy them as you make them!

2 cups cooked, drained chickpeas dried off on paper towels

1/2 cup coconut oil

1 tsp. paprika

1/2 tsp. cumin

1/4 tsp. garlic powder

1/4 tsp. cayenne pepper (optional if you don’t tolerate)

1 tsp. organic sugar

1/2 tsp. sea salt

1/4 tsp. ground black pepper

Mix all the ingredients except the chickpeas and coconut oil in a medium-sized glass or metal bowl.  Set aside.

Heat coconut oil over medium-high heat in a large skillet (use one that has a lid) until oil is hot but not smoking–drop one chickpea in and if it sizzles the oil is hot enough.  As soon as the oil is hot enough add the chickpeas (be sure they are dried off well on paper towels so you don’t get splattering when you add the chickpeas to the hot oil).  Keep a lid on the skillet but keep it cracked when you are not stirring .  Turn the heat down to medium and give the chickpeas an occasional stir as you fry them until crispy for about 12-15 minutes.  All of the oil will be absorbed by the chickpeas as they fry.  As soon as they are lightly browned remove them from the heat and spoon them into the bowl containing the spices.  Stir well.  Taste and add more salt or one of the spices if desired.  Best served warm  but will keep in refrigerator and can be heated up again in a toaster oven.


Filed Under: Monica's Recipes Tagged With: chickpeas, crispy chickpeas, spicy chickpeas

News Flash on Broccoli with Shiitake Mushrooms Recipe

May 24, 2015 by towers

I posted this recipe in early May and just now saw an interesting article about the best cooking method for broccoli–thought I should add that information  to this intro.  Dr. Elizabeth Jeffrey is a nutrition researcher at U of Illinois where she studies cancer preventive compounds in broccoli.  She says that to optimize the concentration of these compounds in broccoli it needs to be bought fresh (NOT FROZEN) and lightly steamed (NOT RAW, NOT MICROWAVED, AND NOT BOILED).  Boy, was I glad to read that;  now I know that the way I’m inclined to prepare it is the best method for maximizing its detoxifying power.

Original post:  Learning how to prepare vegetables so that they are appetizing and retain nutrients is a must if you want to improve your health with a good diet.  Broccoli is easily overcooked into a drab green, limp mess.  Give this simple recipe a try if you need to prove to yourself just how tasty broccoli can be.  Avoid frozen–fresh organic broccoli is widely available year round.  I always have some in my refrigerator.  I try to keep shiitake mushrooms on hand  too as they are the perfect addition when you want to add some heft to a vegetable dish or soup.  It’s a bonus that both broccoli and shiitakes are full of powerful immune system-enhancing phytonutrients.

2 cups broccoli florets
2 cloves garlic
2 tbsp ghee or olive oil
6 medium-sized shiitake mushrooms
salt and pepper

Wash and cut broccoli into florets.  Peel the  tough outer skin of the broccoli “trunk” and discard the peels, and then slice the core you have left into 1/4 inch slices.  Place broccoli in a vegetable steamer with about an inch of water in the bottom of the pan and set aside waiting to steam until right before serving.   Remove mushroom stems and keep for vegetable or meat stocks (they are too woody to eat but will add flavor to soups or stocks–just remove and discard the stems after the stock is cooked)   Clean the mushroom caps with a damp paper towel and then chop them into 1/2 inch pieces.  Melt ghee in a medium sized skillet over medium heat and using a garlic press, crush garlic into the skillet.  Stir until just starting to sizzle (don’t allow to brown and be sure to continue to stir until you add the mushrooms). Add chopped mushroom caps to the skillet and stir over medium heat. Turn off the heat after 2 minutes of stirring.  Add salt and pepper, stir.  Now it’s time to cook the broccoli.  Bring broccoli to a boil, cover and lower heat to a simmer.  Steam and keep the lid on until just tender when pierced with a fork—do not leave your broccoli now or it may overcook.   As soon as  broccoli is tender add it to the skillet and stir well (discard the water in the bottom of your vegetable steamer or you can save it in the refrigerator for vegetable stock  for soups).  Taste and add more  salt and pepper if desired.  Serve immediately.

Filed Under: Monica's Recipes Tagged With: best cooking method for broccoli, broccoli recipe, broccoli with shiitake mushrooms recipe, shiitake mushroom recipe

Cashew Fudge

May 18, 2015 by towers

Here’s a filling fudge that’s not too sweet.  It’s mostly raw,  involves no real cooking, and provides a delicious way to eat coconut oil and raw cacao powder.  Be sure to find cashews that are not oiled and salted–you may need to go to the c0-0p or health food store.  The egg yolk acts as an emulsifier and is not detectable in the final product, so I don’t recommend leaving it out.  Besides, it  boosts the nutritional value of the fudge.  You could substitute coconut oil for the ghee but then you would miss the buttery flavor.

Fudge base:

2 cups roasted cashews (unsalted and without oil)

2 cups shredded coconut

1/2 cup raw cacao powder

1/2 cup honey

2 tsp. vanilla extract

pinch of salt

Fudge icing:

1/2 cup honey or maple syrup

1/2 cup raw cacao powder

2 Tbsp. coconut oil, warm enough to melt

2 Tbsp. ghee, melted

1 egg yolk (only use the best quality egg from a pasture-raised chicken)

1 tsp. vanilla extract

pinch sea salt

Make the fudge base first.  Blend the coconut in a blender or food processor until finely ground.  Process the cashews separately until finely ground.  Mix the two in the food processor and process until well mixed together.   Add the cocoa powder, salt, and honey.  Process until well mixed and forms a ball.  Press evenly (easiest with your hands) into a pyrex baking dish that is lined with waxed paper (8 inch square works well). Cover and refrigerate while you make the icing.

In the food processor (don’t bother washing it after making the base), process the honey, cocao powder,  egg yolk, salt, and vanilla.  Pour in the melted ghee and coconut oil while processing.  Once mixed well pour over the fudge base and spread evenly with a spatula.  Refrigerate until icing is set and firm.  Cut with a knife or pizza cutter.  Lift out squares and keep refrigerated.


Filed Under: Monica's Recipes Tagged With: cashew fudge, coconut oil fudge, healthy fudge, raw fudge

DF Chocolate Pudding

April 29, 2015 by towers

Here’s an easy version of a pudding–no cooking!  You will need a food processor though.  If you are trying to incorporate more coconut oil into your diet this is a good choice.    The ghee adds a buttery flavor but you can substitute all coconut oil if desired.   Be sure to use organic raw cocoa powder to get the maximum amount of the phytonutrients that chocolate provides.  If you wish to make a lower carb version, try stevia or monk fruit instead of the honey.  This is very rich and is best served with some fresh berries.

Serves 4

1 perfectly ripe avocado–slightly soft so it scoops out easily but not brown or bruised inside

1 ripe banana

3 Tbsp. raw organic cocoa powder

1/4 cup honey

2 tsp. vanilla extract

2 Tbsp. coconut oil

2 Tbsp. ghee or another 2 Tbsp. coconut oil

1/4 cup organic canned coconut milk (the full fat or classic that comes in a can)

Melt the ghee in a small bowl.  Add the coconut oil and warm just enough that both are liquid and set aside.  Half the avocado and remove the pit.  Scoop out the avocado and place in the food processor.  Add the banana, honey, cocoa powder,coconut milk,  and vanilla.  Process until smooth and homogeneous.  While the processor is running slowly pour in the oil.  Process until thoroughly mixed.  Taste and correct sweetness by adding more honey  if desired.  Serve with fresh strawberries, raspberries or blueberries.  The pudding will thicken more when it is chilled.  Keep refrigerated..

Filed Under: Monica's Recipes Tagged With: dairy-free chocolate pudding, dairy-free pudding, raw pudding

GF/DF Carrot Cake

April 2, 2015 by towers

Here’s a lower-carb version of carrot cake made with coconut “flour” and some honey. It is gluten-free (grain-free actually) and dairy-free.   I made this for our monthly nutrition meeting’s potluck and it was a success.

1 1/2 cups organic shredded coconut blended into a “flour”

1/4 cup arrowroot powder

2 eggs

1/4 cup honey

1 large organic carrot, grated

1 tsp. vanilla extract

2 Tbsp. organic raisins

1 tsp. baking powder (aluminum-free)

1 tsp. cinnamon

1/2 tsp. allspice

1/8 tsp. clove

1/2 tsp. sea salt

Blend the shredded coconut in a blender.  This will reduce the volume to about 1 cup.  Place this into the food processor with the arrowroot, the spices, and salt.  Process to evenly mix. Add honey, vanilla, eggs and process until thoroughly mixed.  Stir in grated carrots and raisins.  Use a rubber spatula to spoon into an oiled (with coconut oil) baking dish (about 8″x8″ or 1 round cake pan).  Bake at 350 degree F for about 20 minutes or until a knife placed  in the center comes out clean.  Cut into squares.

Filed Under: Monica's Recipes Tagged With: carrot cake made with coconut flour, dairy-free carrot cake, gluten-free carrot cake, grain-free carrot cake

Salsa Verde

March 16, 2015 by towers

You either like anchovies or you don’t.  If you like them then this recipe is for you!    It’s delicious on roasted potatoes, sweet potatoes,  and other roasted or steamed vegetables.  The combination of flavors is intense but fantastic!  Plus it has a fair amount of cilantro in it–I love to incorporate cilantro into our meals because it is proven to assist the body in excreting heavy metals such as mercury.

2 cups mixed fresh parsley and cilantro, coarsely chopped (I use equal amounts of each)

3 medium-sized  cloves garlic, crushed

1 and 1/2 tsp. balsamic vinegar

2 Tbsp. capers

3-5 (packed in olive  oil) anchovy fillets (depends on how much you like anchovies–I like using 5 fillets)

black pepper

1/4 cup extra-virgin olive oil

Combine the cilantro, parsley, garlic, vinegar in a food processor.  Pulse until greens are  chopped fine.  Add all other ingredients except olive oil.  Pulse again until well mixed and pulverized.  Place olive oil in a bowl and add green mixture.  Stir well.  Taste to correct seasoning.  It may need some salt but generally the salt from the anchovies is sufficient.  Spoon over vegetables.  Keeps refrigerated for up to 3-4 days.


Filed Under: Monica's Recipes Tagged With: anchovy recipe, caper recipe, cilantro recipe, salsa verde recipe

« Previous Page
Next Page »

Subscribe to get our Blog posts in your email.

* indicates required
/* real people should not fill this in and expect good things - do not remove this or risk form bot signups */

Intuit Mailchimp

(We don't spam or sell your email.)

Recent Posts

  • Safer, Healthier Breast Screening in Roanoke
  • Listen to Your Wife
  • First Time In My Life
  • Four-Season Gardening
  • Cry For Help

Categories

Tags

arm and hand numbness avocado recipe avocado smoothie back pain breastfeeding latching problems butternut squash recipe coconut oil collard greens recipe cultured vegetables daikon radish recipe difficult neck movement dill sauerkraut eggplant recipe foot pain GAPS friendly GAPS friendly recipe gentle chiropractic adjustments gluten-free gluten-free recipe headaches headaches and chiropractic healthy chicken salad herb tea high fructose corn syrup hip pain immune system support jaw pain knee pain knee pain and chiropractic low back pain low back pain and chiropractic migraines neck pain neck pain and chiropractic treatment pesto recipe raw fudge sciatica scoliosis separated shoulder and chiropractic shoulder injury shoulder pain shoulder pain and chiropractic sweet potato soup vegetable juice weight loss

Good Nutrition

Warming Broth for a Cold

When you're feeling down with a cold, the last thing you may want to do is cook!  Well, if you keep a few ingredients on hand you can make this nourishing, soothing broth in a few minutes.  If you … [Read More...]

  • Oatmeal is Back
  • Ginger Punch with a Kick
  • Polenta

Children’s Adjustments

Children's chiropractic adjustment at Towers Chiropractic

Children with back pain

Children suffer injuries that lead to misalignments just as adults do. Children generally respond very well and quickly to gentle chiropractic adjustments. A case in point is that of a 5 year-old … [Read More...]

  • Adjusting Children

Towers Family Chiropractic

2302 Colonial Ave, SW, Ste A
Roanoke, VA 24015
(540) 343-6636

Our hours are:
Monday, Wednesday, Friday:
10:00am – 1:00pm and 2:00pm – 6:00pm
Tuesday, Thursday:
7:30am – 11:30am and 12:30pm – 4:00pm
Saturday:
9:00am – 12:00pm

These statements have not been evaluated by the Food and Drug Administration. The information on this website is not intended to treat, diagnose, prevent, or cure any disease.

Copyright © 2025 · Towers Family Chiropractic by Soupbone Creative