Towers Family Chiropractor

Helping You to Better Health Naturally

  • Home
  • About Us
  • Our Chiropractic Services
    • Chiropractic Care
    • Acupuncture
    • Nutrition Services
  • Helpful Videos
    • Posture Screening for Scoliosis and Posture Imbalances
    • Spinal Exercises
  • Patient Forms
  • FAQ
  • Contact Us
  • Chiropractic Solutions
  • Children’s Adjustments
  • Monica’s Recipes
  • Nutrition News
  • Healthy Habits
  • Patient Testimonials

Late Summer Soup

September 7, 2020 by towers

The nights are getting cooler and soup is on the menu again.  The garden is supplying lots of tomatoes and butternut squash and so are the farmers markets.  I admit the combination of these two late summer bumper crops in a soup was not appealing to me, but given the garden’s abundance and the fact that I had some chicken broth in the fridge that I needed to use, I was inspired to try!  We liked the outcome and encourage you to give it a go.


Serves 4

4 cups cubed peeled, butternut squash (cut in half lengthwise and remove the seeds and discard, and then cut in quarters and peel each quarter before cubing)

2 cups chopped peeled red tomatoes, seeds removed (any kind but be sure to remove the skin and seeds)

1 large yellow onion, chopped

1/4 cup ghee or coconut oil (I prefer ghee)

2 cups chicken broth (or water but broth makes a more flavorful soup–if you use water add 2 stalks of chopped celery)

1 cup organic classic coconut milk

1 tsp. ground cumin seed

1/2 tsp. ground paprika

2 cloves of garlic, crushed

sea salt to taste (Redmond or Celtic are good)

red pepper flakes to taste, optional

1/4 cup fresh basil leaves, optional


Saute the onion in the melted ghee in a soup pot for five minutes.  Stir in the celery (if you use water, not broth), garlic, cumin and paprika.  Add the squash and stir again over medium heat for a few minutes more.  Add the tomato and and 1 cup of water and bring to a simmer.  Add stock and bring to a simmer over medium-high heat and then reduce to low heat and cover soup pot with a lid.  After about 20-30 minutes once squash pieces are tender and easily pierced with a fork, add the coconut milk.  Simmer for a few minutes.  Use an immersion blender and blend until smooth.  Salt to taste and add red pepper flakes and basil leaves if desired.  Serve hot.


Filed Under: Monica's Recipes Tagged With: butternut recipe, soup recipe, tomato recipe

Easy Sour Pickles

September 4, 2020 by towers

If you haven’t tried to make sour pickles, it’s a good time of year to give it a go—it’s so easy and there’s no canning necessary!  You should be able to find locally grown organic cucumbers.  Smaller, pickling varieties are best, but even regular eating cukes are good but they should be on the small side so that they are less seedy.  I’ve posted this recipe before but I have made some changes.  Please read the earlier recipe post to get more information and then give this version a try.  I have found that I get better results when I make just a quart at a time and when I keep them fermenting in a cooler with an ice pack to maintain a lower temperature (65-70 degrees F is best).

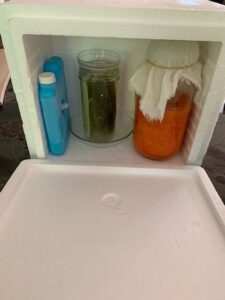
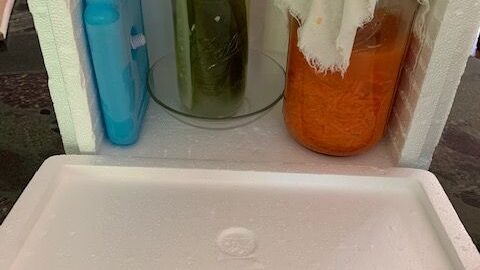
Here’s a picture of my set up.  There’s one quart of pickles and a jar of ginger carrots fermenting at the same time in this photo. You can put a glass dish or jar on top of the pickles to keep them submerged.  Also, if you place a dish or bowl under the jar if the brine overflows as the pickles  ferment you won’t have a mess.  Since the dish completely covers the mouth of the pickle jar I did not need to cover it with cheese cloth (not the case for the carrots).

I have a  styrofoam cooler that can sit on my counter-top and when placed on its side it fits both quart and 1/2 gallon wide-mouthed jars.  All you need is one ice pack changed twice a day–before bed and first thing in the morning to keep it cool enough. If you keep your house air-conditioned and at a constant low temperature (about 70) you won’t need the cooler.

The ratio for brine is 3 Tbsp. of sea salt to 1 quart of water.  If your brine is not salty enough the pickles will spoil.  I have found that if made in smaller batches (a quart instead of a gallon), it’s easier to accomplish and I can just use the extra cucumbers as they come from the garden.  Remember, this is a way of preserving food–these pickles will keep for months in your refrigerator.  Don’t pack the jar with cucumber halves–put them in loosely, otherwise you may not have enough brine to do the job.

For 1 quart of pickles:

About 2-4 small cucumbers, washed well and sliced in half (size will determine how many you can fit in the jar)

1 sprig of fresh dill or 1 tsp. dried dill weed, optional

3 large cloves garlic, optional

About 1/2 to 3/4 of a quart of brine:  3 Tbsp. sea salt (I like Redmonds or Celtic) per quart of filtered water (don’t use chlorinated water)

Arrange as many of the cucumber halves in a quart-sized, wide-mouth  glass jar as will fit easily.  Also leave a space of at least 2 inches at the top of the jar.  I place them in vertically, side-by side.  Add the dill and garlic, if desired, by pushing them down in the spaces between the cucumbers.  Dissolve (by stirring well) 3 Tbsp. of salt in 4 cups of filtered water in a quart mason jar.  Pour this over the cukes  to within an inch of the top of the jar.    Now place a small glass bowl over the mouth of the jar–it should fit so that the cucumber halves are kept submerged and the mouth of the jar is completely covered but CO2 will still be able to escape (don’t cap the jar with the lid!)– remove the bowl and add more brine to cover the cucumbers if the cukes are not completely submerged.  Place in a 65-70 degree F room out of direct light or use a cooler as described above.  Put a plate or bowl under the jar just in case some brine spills over as the fermentation proceeds.    Check every day to be sure the cukes stay submerged.  The pickles should bubble as they ferment and be soured through in 4-7 days (should be dark green all the way to the center).  Cap the jar and keep in the refrigerator.

Filed Under: Monica's Recipes Tagged With: Easy sour pickles, sour pickle recipe

Avocado Dressing

August 28, 2020 by towers

Don’t throw away the juice from your cultured vegetables–some people drink it (in small amounts or diluted because it is salty) but I discovered it makes very good salad dressing!  It may be hard to believe–sauerkraut juice in salad dressing?–but made as I describe below it is delicious.  You’ll need a blender.


1-1/2 cups of salad dressing


1/2 cup sauerkraut juice

1/2 avocado

1-2 tsp. honey (you could try monk fruit instead but I like the honey)

1 Tbsp. apple cider vinegar (I use the vinegar from marinated red onions)

1/4 cup extra-virgin olive oil


Place all ingredients in a blender and blend well.  You should not have to add salt as the sauerkraut juice is salty.


Filed Under: Monica's Recipes Tagged With: avocado salad dressing

Thanks to Friends

August 24, 2020 by towers

Please explain why you came to our office.

“After being diagnosed with arthritis in my lower back about three years ago and going through several sessions of therapy and shots that did not relieve the pain, friends told me about Towers Family Chiropractic.”

Please describe your response to treatment.

“The pain has been relieved quite a bit.”

81 year-old female

Filed Under: Patient Testimonials

Greenbeans with Celeriac

August 24, 2020 by towers

Celeriac or celery root should be showing up at the farmers markets and produce sections now that late summer crops are ready to harvest. If you haven’t tried this unusual vegetable yet this simple recipe may inspire you.   I just started digging up a few at a time in my garden.  I’ve posted soup recipes that had celeriac as an ingredient and they do make flavorful, creamy soups when cooked until soft and blended.  This recipe uses finely chopped pieces of the root so that it will cook tender in about the same time as the green beans–just put them in the same vegetable steamer.  The roots have to be peeled–a bit of a chore but easier with a vegetable peeler.

Serves 2

2 cups chopped fresh greenbeans

1 cup peeled and chopped celeriac root (no bigger than 1/2 inch cubes)

1 Tbsp. butter or ghee

salt to taste

black pepper to taste, optional

Put the beans and celeriac cubes in a vegetable steamer.  Bring water to a boil and then cover and reduce heat to low to gently steam the vegetables for about 5 or more minutes.  Keep an eye on them piercing a few times during steaming so they don’t overcook.  You want them perfectly tender but not soft.  As soon as they are tender, remove from steam and transfer to a bowl.  Add the butter or ghee and cover so that it melts.  After a few minutes, stir the butter or ghee in and add salt and pepper, if desired, to taste.  Serve immediately.

Filed Under: Monica's Recipes Tagged With: celeriac root recipe, green beans with celeriac recipe

Get to the Source of the Problem

August 17, 2020 by towers

Please explain why you came to our office.

“I have been to probably a dozen chiropractors in my life and Dr. Burgoon is without question one of the top two, possibly the best.  He knows the technical skills to a tee, and he has great intuition that guides him to locate the source of the problem.”

Please describe your response to treatment.

“I come in mostly for maintenance but whenever I have an acute problem, I always feel better and begin healing right after visiting Dr. Burgoon.”

~57 year-old male

Filed Under: Patient Testimonials Tagged With: chiropractic maintenance care

Relief After First Treatment

August 14, 2020 by towers

Please explain why you came to our office.

“I was in pain–went from my hip to ankle on left leg.  Because of Covid no chiropractor open in my area; a friend suggested Dr. Burgoon.  I called and was welcomed to come in right away.”

Please describe your response to treatment.

“After  first treatment I had relief and it didn’t take long before I was walking without any pain at all.   And am having other good results from treatment for things I had issues with but didn’t realize were connected to my lower back problem.”

~70 year-old female

Filed Under: Patient Testimonials Tagged With: hip and leg pain and chiropractic, low back pain and chiropractic

Very Positive Acupuncture Results

August 5, 2020 by towers

Please explain why you came to our office.

“I have struggled with hyperhydrosis, migraine headaches and arthritis in my hands.  Also, lower back pain from my scoliosis.”

Please describe your response to acupuncture treatment.

“I have had very positive results with all of the above.  Dr. Mike is so compassionate to the needs of his patients and I am truly appreciative of his care.”

65 year-old female

Filed Under: Patient Testimonials Tagged With: acupuncture and migraines, acupuncture treatment and back pain

Natural Deodorant with Essential Oils

July 22, 2020 by towers

If you have a collection of essential oils you likely have what you need to make a simple, effective deodorant.  You will need good quality grain ethyl alcohol too–such as Everclear or high proof vodka or gin (organic versions are available).  General rule of thumb–use 10 drops of a combination of specific essential oils (listed below) per ounce of alcohol.  Best not to use rubbing alcohol due to questionable purity for using on a daily basis.

We’ve been using variations of essential oils in this recipe for years and love it–always smells great and it works!


Glass 2-4 ounce spray bottle (we used an empty Weleda spray deodorant bottle)

2-4 ounces of grain alcohol

10 drops total of essential oils per ounce of grain alcohol;  good choices are tea tree, lavender, chamomile, lemongrass, sage, geranium, jasmine, sweet orange, grapefruit, lemon, frankincense.  Be sure to include the tea tree oil and at least 2 of the other choices that are printed in bold.

Pour the alcohol in the spray bottle.  Add your combination of essential oils.  Shake before application.


Filed Under: Healthy Habits, Monica's Recipes Tagged With: homemade natural deodorant spray

Onions with Basil Oil

June 29, 2020 by towers

It’s the season of onions and basil, especially if you are a gardener.  While fresh basil is usually available year-round in grocery stores, it is never as good as the very fresh leaves from your garden.  Now that I have an abundance from my garden I make basil oil every few days so there’s always some in the fridge. If you don’t have basil plants, support your local farmers market where you should be able to find it.

The basil oil recipe was posted last year and you can find it here.  If you have that already made this onion topping recipe can be made very quickly.

And on the topic of onions–don’t neglect them!  They are relatively inexpensive and store well so it makes sense to always keep them on hand.  If you have them in the garden they are likely ready to start harvesting.  Because they are so flavorful, onions can jazz up lots of other vegetables.  The other night I made this onion recipe to use as a topping on gluten-free pizza.  I spread some of the basil oil on the fresh-from-the-oven baked crust and then topped with these onions plus some pitted olives.  If you eat dairy, it would be delicious to put grated cheese over the basil oil and then top with the onions–just put it under the broiler for a few minutes to melt the cheese if desired.  Other options for the onions besides pizza are steamed green beans, broccoli, or cauliflower.  Of course, they would be good with the basil oil on pasta and I’ve done this with organic brown rice fettuccine.


Serves 2

1 cup chopped yellow onion

2 tsp. basil oil


Place the chopped onions in a baking tray (about 8 x 10-inch size).  Add the basil oil and stir until onions are coated. Spread the coated onions in a thin layer over the surface of the pan.   Bake in a 350 degree oven for 15 minutes or so.  Serve immediately.

Filed Under: Monica's Recipes Tagged With: basil recipe, easy pesto recipe, onion recipe, pizza recipe

« Previous Page
Next Page »

Subscribe to get our Blog posts in your email.

* indicates required
/* real people should not fill this in and expect good things - do not remove this or risk form bot signups */

Intuit Mailchimp

(We don't spam or sell your email.)

Recent Posts

  • Safer, Healthier Breast Screening in Roanoke
  • Listen to Your Wife
  • First Time In My Life
  • Four-Season Gardening
  • Cry For Help

Categories

Tags

arm and hand numbness avocado recipe avocado smoothie back pain breastfeeding latching problems butternut squash recipe coconut oil collard greens recipe cultured vegetables daikon radish recipe difficult neck movement dill sauerkraut eggplant recipe foot pain GAPS friendly GAPS friendly recipe gentle chiropractic adjustments gluten-free gluten-free recipe headaches headaches and chiropractic healthy chicken salad herb tea high fructose corn syrup hip pain immune system support jaw pain knee pain knee pain and chiropractic low back pain low back pain and chiropractic migraines neck pain neck pain and chiropractic treatment pesto recipe raw fudge sciatica scoliosis separated shoulder and chiropractic shoulder injury shoulder pain shoulder pain and chiropractic sweet potato soup vegetable juice weight loss

Good Nutrition

Warming Broth for a Cold

When you're feeling down with a cold, the last thing you may want to do is cook!  Well, if you keep a few ingredients on hand you can make this nourishing, soothing broth in a few minutes.  If you … [Read More...]

  • Oatmeal is Back
  • Ginger Punch with a Kick
  • Polenta

Children’s Adjustments

Children's chiropractic adjustment at Towers Chiropractic

Children with back pain

Children suffer injuries that lead to misalignments just as adults do. Children generally respond very well and quickly to gentle chiropractic adjustments. A case in point is that of a 5 year-old … [Read More...]

  • Adjusting Children

Towers Family Chiropractic

2302 Colonial Ave, SW, Ste A
Roanoke, VA 24015
(540) 343-6636

Our hours are:
Monday, Wednesday, Friday:
10:00am – 1:00pm and 2:00pm – 6:00pm
Tuesday, Thursday:
7:30am – 11:30am and 12:30pm – 4:00pm
Saturday:
9:00am – 12:00pm

These statements have not been evaluated by the Food and Drug Administration. The information on this website is not intended to treat, diagnose, prevent, or cure any disease.

Copyright © 2025 · Towers Family Chiropractic by Soupbone Creative