Towers Family Chiropractor

Helping You to Better Health Naturally

  • Home
  • About Us
  • Our Chiropractic Services
    • Chiropractic Care
    • Acupuncture
    • Nutrition Services
  • Helpful Videos
    • Posture Screening for Scoliosis and Posture Imbalances
    • Spinal Exercises
  • Patient Forms
  • FAQ
  • Contact Us
  • Chiropractic Solutions
  • Children’s Adjustments
  • Monica’s Recipes
  • Nutrition News
  • Healthy Habits
  • Patient Testimonials

Chicken-Broth Rice

June 15, 2020 by towers

In the summer when it is too hot for soup, you can use your chicken broth to make flavorful rice.  If you are not making your own broth, give it a try–see a previous post for this recipe.  It’s easy and economical, when you buy a whole chicken for the meat, to follow up with a batch of broth.  Keep in mind that home-made broth has some fat in so I don’t add any additional oil or ghee to the rice once it is cooked.

Serves 2

1 cup organic brown basmati rice

1 cup chicken broth

1 cup water

1/2 tsp sea salt

1 Tbsp or so organic GF tamari, optional

Place broth in a sauce pan and heat it if it is a gel until  it “melts”. (If it has been refrigerated and it is made correctly, it will be a gel.  Again, follow the broth recipe that is linked above for really good broth.)

Rinse rice under running water and drain.  Add the rice to the warmed broth and add the cup of water and salt.  Bring to a boil over high heat and then immediately reduce heat to low so the mixture just simmers.  Cover with a lid and continue to simmer undisturbed (don’t remove lid) for 30 minutes.  Remove lid (all the liquid should be absorbed and if it isn’t continue to simmer with the lid on for another 5 minutes or so).  Add  tamari or salt to taste but fluff the rice with a fork to mix–gently lift the rice from the outside toward the middle.  Serve immediately.
 

Filed Under: Monica's Recipes Tagged With: chicken broth recipe, rice made with chicken broth, rice recipe

Another Sauerkraut Recipe Revisited

June 5, 2020 by towers

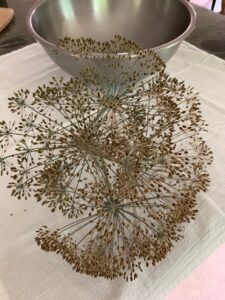
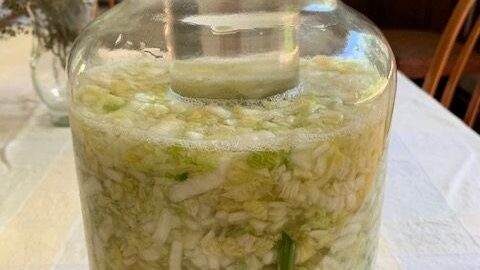
Originally posted in 2014, this recipe is worth revisiting.  It can be as simple as cabbage and salt and dill, which is what I used last week when my Chinese cabbage started coming in.  I have an abundance of dill seed heads from the greenhouse.  No need to remove them from the stems–I just put the whole seed head in the bottom of the fermenting jar and added the cabbage on top of it.  Dill is good at self-seeding so if you’re not growing it, consider buying some and let it go to seed in your garden–you’ll be pleasantly surprised to see it coming up the next year.

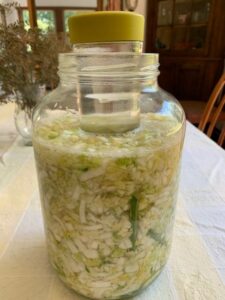
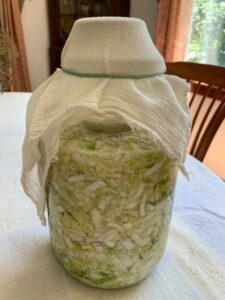
Note the pictures above.  You don’t need anything fancy–just a wide mouth jar for the cabbage mixture and a smaller jar filled with water  to act as a weight and which fits inro that wide mouth.  Cover it all with cheese cloth.  This is all explained in the previous posts that I link below.

Here’s the original recipe:

Cabbage galore no more–finally the garden cabbage is gone!  The last couple of batches I made were kept pretty simple but delicious just the same–I wanted to share these options with you.  First, don’t underestimate the flavor of fresh herbs for improving the taste of your cultured veggies.  I have dill growing in my garden and have been adding lots of  it to the last couple of batches of sauerkraut I’ve made.   It seems that the dill tones down the cabbage quite a bit in both smell (while fermenting too) and taste.  Second, I’ve been adding chopped cucumber to the fermenting sauerkraut for the last 1 or 2 days of fermentation.  This allows the cucumber to pick up the dill and garlic flavors but retain its crispness.  Have fun experimenting!

1-2 large head of Chinese cabbage (this is about 1 gallon finely chopped)

1 cup of fresh dill weed chopped fine or 1 flower head of dill seed

3 large cloves of garlic, crushed

1-2 Tbsp. sea salt, depending on the size of the cabbage

About 3-5 days later 1 cucumber, chopped

Cut the cabbage in half and core each half.   Cut side down,  quarter lengthwise.  Then holding the quarters together chop across in 1/4 inch slices.  This will result in a fairly fine shred.  I find this easier with this type of cabbage than shredding with a grater.  Put cut cabbage into a large bowl.  Add rest of ingredients except cucumber.  It should taste salty–this is important because the salt inhibits mold growth.  Follow directions for fermenting described in the previous recipe.  After about three to five days  (taste the mixture daily and proceed when it has fermented to your satisfaction), chop a cucumber lengthwise in half or in quarters and then in 1/4 inch slices across.  Stir it into the sauerkraut and press the vegetable mix down into the juice.  Let ferment another day. Keep refrigerated.


Filed Under: Monica's Recipes Tagged With: dill sauerkraut

Importance of NAC

May 21, 2020 by towers

May 2021 Update on this post about NAC.   Amazon and some other suppliers are removing NAC and products containing it from there sites.  Read the updated article here.   There will be legal challenges as it appears that the FDA is on shaky ground on this one.  My supplier has been inundated with orders so NAC is TOS but more is in production and it should be available in June.  Call the FDA and let them know you want easy access to this very safe nutritional supplement.

Original post.  N-acetyl cysteine (NAC) has been recommended by nutritionists for decades as a very safe amino acid nutritional supplement that is a precursor for  glutathione  production in the body.  (Glutathione is a major de-toxifier.)  The FDA is hinting that it may review this supplement’s classification and, therefore, possibly make it difficult to purchase.  Please give the FDA a call at 888-463-6332 and ask that the classification not be changed.  NAC has many other important functions in humans–take a look at this Mercola.com article to learn more about FDA’s actions and the benefits of NAC.


Filed Under: Nutrition News

Really Good Mayonnaise

May 18, 2020 by towers


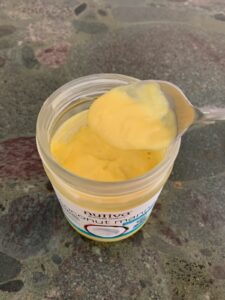
I have seen recipes online for making mayo right in a wide-mouth glass jar in one step using an immersion blender–this is a great idea!  And it is my preferred method now that I know how well it works.  I have had it fail a few times but I think that was because I did not wait until the ingredients came to room temperature.

Here’s my version which uses a blend of equal parts olive, sesame and coconut oils.  You could use all olive oil or just two oils– olive and sesame or coconut.

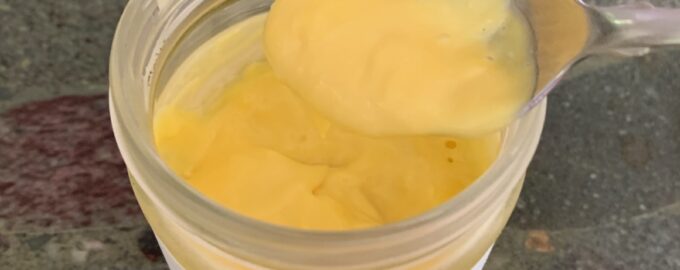
Look at the gold color of this mayo in the picture–the result of using very good quality eggs from pastured chickens.  Only use the best quality eggs since the product is not pasteurized.


2 egg yolks from pasture-raised chickens fed antibiotic/hormone-free feed, room temperature

1 tsp.. honey–optional

2 Tbsp.. raw, organic apple cider vinegar

1/4 to 1/2  tsp. sea salt

1 tsp. prepared yellow mustard

1/3 cup (room temperature–not cold) each of extra-virgin olive oil, cold-pressed organic sesame oil, and organic coconut oil

OR 2/3 cup of extra-virgin olive oil and 1/3 cup of sesame  or coconut oil


Be sure your ingredients are at room temperature.  Place the egg yolks in a clean, dry wide-mouthed glass jar (16 or 32 ounce size).  Add the  apple cider vinegar, salt, mustard, and honey.  Pour the oil on top. Place the blender head all the way into the bottom of the jar where the egg yolks are and pulse briefly in bursts while holding the head in place (the bottom of the jar).  Do not move the blender head up and down until you see the “creamy white” mayo forming around the blender head and then only move it up slowly.  Be patient and only pulse a few seconds at a time.   Once the egg yolks and other ingredients are clearly well mixed and the oil is starting to get pulled in and changing to creamy yellow in color  continue to pulse while moving the head of the blender very slowly up and down gradually working your way up as the oil gets pulled in.  Do this until all the oil is emulsified.  Do not over-mix–as soon as the mayo completely forms, stop!  The mayo should be thick by this time–as thick as regular mayo but it will thicken more once refrigerated.   Keep refrigerated. Very nice to have a lot less clean-up–store the mayo in the fridge in the mason jar!

Filed Under: Monica's Recipes Tagged With: home-made mayonnaise recipe, mayonnaise recipe

White Bean Salad

May 15, 2020 by towers

This salad involves no cooking (nice now that the weather is warming up!) and is very quick to put together if you have some of the ingredients made ahead.  I routinely make  marinated red onions, ginger carrots, and a mustard-honey dressing (make it without the miso for this recipe) so that I usually have them in the refrigerator.  Also, it helps to have some cooked beans in the freezer; I cook big batches of either pinto or garbanzo beans, and sometimes navy beans so that I can freeze some in pint-sized containers.

Serves 2-4             Served over bed of lettuce

2 cups cooked navy beans (small white beans)

1/2 cup ginger carrots

1/4 cup marinated red onions

2 stalks celery, finely chopped

1 avocado, cubed

1/2 cup mustard honey dressing

fresh parsley or cilantro, finely chopped and optional

salt to taste

lettuce of your choice (2 cups per person for a big salad)

Evenly mix all the ingredients except the dressing and salt in a  bowl.  Add the dressing and stir well again.  Add salt to taste.  Serve over a bed of lettuce in individual salad bowls.

Filed Under: Monica's Recipes Tagged With: white bean salad recipe

Sunchoke Soup

April 20, 2020 by towers

Yesterday I found a surprise in my garden–lots of sprouting sunchokes (aka Jerusalem artichokes) that were growing out of control.  The tubers were large and in good condition.     I normally slice them and serve them raw in salads but this was over a pound of tubers so I decided to make soup.  This recipe is similar to the Celeriac soup recipe posted earlier.  Sunchokes, like celeriac, are non-starchy making them low-glycemic.

For the gardeners out there, these potato-like tubers are easy to grow, prolific, and survive the winter  so that they come back each year.  But be careful where you plant them as they can be invasive—I thought I had harvested them all but apparently I missed some and they spread into my iris patch.

Produce departments usually have them in the Fall and Winter, but you may find them now as they are still available at our Co-op.  Be sure to scrub them well with a vegetable brush as they are knobby.  No need to peel after scrubbing but use a paring knife to remove spots that could be harboring dirt or sand.

Usually milk or cream is used in sunchoke soup, but I used yellow miso.  If you don’t have miso and are dairy tolerant, use 1 cup of cream or half-and-half instead.


Serves 4-6

1 large yellow onion, chopped

4 Tbsp. ghee

1 pound of sunchokes, chopped into 1/2 inch pieces

1 celeriac root, peeled and cubed or 2 stalks of celery, chopped

4 cups of chicken or vegetable broth or water

1/4 cup of MisoMaster mellow miso or 1 cup of cream or half-and-half

Salt and black pepper to taste

In a soup pot melt the ghee over medium heat.  Add the onions and saute 5 minutes stirring occasionally.  Add the celeriac or celery and saute another few minutes.  Add the sunchokes.  Stir well.  Add the broth or water and bring close to a boil. Reduce heat to low to keep the soup at a simmer–don’t boil.  Cover with the lid cracked.  Simmer until vegetables are tender and pierced easily with a fork.  If you are using milk, add that now and heat for a few more minutes.  Remove from heat.  Use an immersion blender to puree.  Add the miso if you are using miso and blend again.  Salt and pepper to taste.  Serve hot.


Filed Under: Monica's Recipes, Uncategorized Tagged With: Jerusalem artichoke soup, sunchoke soup

Dahl with Fresh Ginger

April 15, 2020 by towers

Dahl is a spicy lentil stew made with red or orange lentils.  Unlike the green or brown larger-sized lentils which are purchased unprocessed and can be sprouted (see  recipes), the red or orange lentils are available processed (dehulled, split, and polished) so they will not sprout.  They can still be soaked overnight and rinsed well before cooking to reduce some of the anti-nutrients naturally occurring in legumes.  They cook  quickly because of the processing and soaking.

Usually served with basmati rice, dahl is also good with steamed vegetables and/or some kind of bread.  The spices are warming and anti-inflammatory and the dish is very nourishing.  I found organic orange lentils at our co-op and was excited to make a pot of dahl on a chilly, overcast Spring day.  Make enough for leftovers as it is still very good re-heated.

Makes 6 servings

2 cups dry red or orange lentils, preferably organic, soaked in 2 quarts of water overnight, rinsed very well in a strainer, and drained

2 medium-sized onions, finely chopped

1/4 cup plus 1 Tbsp ghee

4 Tbsp. grated, fresh ginger (peeled first)

3 cups chicken or vegetable broth and 3 cups of water, or 6 cups of water

6 cloves fresh garlic, peeled and crushed through garlic press

2 tsp. ground turmeric

2 tsp. ground cumin

1/2 to 1 tsp. ground cayenne (optional)

salt to taste

fresh cilantro, chopped, for garnishing (optional)

Melt 1/4 cup of the ghee in a 4-quart soup pot over medium heat.  Add the onion and saute 5 minutes.  Add the ginger, turmeric, and 3 cloves of the garlic (crushed) and stir over medium heat for another minute or two–don’t let the garlic brown.    Carefully pour in the broth or water and add the lentils. Stir well and increase heat to bring to a boil.  Reduce heat to low and let simmer under a cracked lid stirring occasionally.  Allow to simmer for an hour or until it reduces to the consistency you desire.

About fifteen minutes before serving, melt the remaining 1 Tbsp ghee in a small sauce pan.  Add the cumin and cayenne if desired and saute over medium heat for a few minutes while stirring.  Add the remaining 3 cloves of crushed garlic and stir for 1 minute.  Remove from heat.

Use a potato masher to pulverize the lentil mixture to a creamy consistency (or use an immersion blender).  Add the cumin/garlic mixture and stir well.  Salt to taste and add more cayenne if desired.  Spoon into bowls over brown basmati rice or steamed vegetables and garnish with cilantro if desired.


Filed Under: Monica's Recipes Tagged With: dahl, dahl with fresh ginger

Chicory Root Chaga Tea with coconut milk or oil

March 24, 2020 by towers

While you can make this tea with just chicory root, if you have chaga it is a nice combination.  Chaga is a mushroom that grows on birch trees in northern latitudes. You may not find it locally–I order online (from Optimally Organic).  It was used traditionally as a medicinal tea for general well-being/immune system support and longevity and is very high in anti-oxidants as measured by ORAC.  It does not contain caffeine. Be sure to get wild-crafted Chaga that was harvested from birch trees growing in northern Canada.   The best part is that Chaga tea tastes good and you could just have it alone!

Roasted chicory root has a long history of being used as a coffee substitute;  it makes this tea stronger and blacker with a bitter component that is similar to coffee.  Another bitter root to combine with chicory is burdock root which is one of my favorites as a coffee substitute–I use about 3/4 tsp. organic, dried and cut burdock root to 1 tsp. chicory root.

There are lots of options for what you may want to add for flavor and medicinal value–cinnamon, cardamom, licorice root, burdock root, anise seed, fennel seed, dried and ground organic orange rind, vanilla, cocoa powder.  I usually also add a tablespoon of collagen powder (Great Lakes) and I like to add  raw cocoa powder sometimes for ” hot chocolate”. But these are optional ingredients.  The coconut milk makes it rich and gives it body. This drink will remain “low carb” if you avoid adding any form of concentrated sugar to it and use stevia or monk fruit instead.

One other note, if you prefer to use coconut oil instead of milk, you can get this to emulsify in your tea by adding lecithin also and then blending with an immersion blender (it doesn’t froth up unless you blend it).  Lecithin powder made from organic sunflower seeds is now available online and may be in your health food store; this is the best type of lecithin to use as I don’t like the ones made from soy.  If you don’t use the lecithin, the oil will pool on the top of your tea.

1 tsp. dried Chaga granules

1/2 tsp. organic orange peel granules (optional)

1/2 tsp. dried burdock root or dandelion root (optional)

1 tsp. roasted chicory root granules

2 cups boiling water

stevia extract or monk fruit powder to sweeten to taste if desired

1/4 tsp. vanilla extract

1/4 cup classic coconut milk (from dry coconut milk powder or Native forest organic in a can) OR 1 Tbsp of coconut oil and 1 tsp. of lecithin OR if you are not sensitive to dairy 2 Tbsp cream

Optional:  2 Tbsp. Great Lakes Collagen powder and 1 tsp. cocoa powder

Place chaga (or other herb tea) and chicory in a quart-sized glass mason jar. Add the boiling water (be sure a spoon is in the jar so it doesn’t crack).  Cap the jar and let sit for at least 15 minutes to extract.  Now if you want your tea very warm strain it into a pan and add the coconut milk and warm it until it just simmer before pouring into a mug and adding the rest of the ingredients.   Otherwise, strain the tea into a mug and add the rest of the ingredients.
If you use coconut oil and lecithin instead of coconut milk, add these two ingredients when the strained tea is in the pan.  Add your other ingredients and use an immersion blender to froth this mixture up.  Warm it up if desired by bringing just to a simmer.  Drink warm.

Filed Under: Monica's Recipes Tagged With: chicory root tea, coffee substitute, dairy-free hot beverage

Headache Relief!

March 6, 2020 by towers

Please explain why you came to our office.

“I’ve been treated by Chiropractic Care since 2001.  My doctor left the area and he referred my daughter and myself here.  I came in for headaches and am so glad I did.”

Please describe your response to treatment.

“Relief!  Complete relief after an awesome adjustment.”

~39 year-old female

Filed Under: Patient Testimonials Tagged With: headache relief with chiropractic

Shoulder Stiffness

March 6, 2020 by towers

Please explain why you came to our office.

“Pain and stiffness in left shoulder, chest, and neck.”

Please describe your response to treatment.

“After a few sessions, my strength started to bounce back, and my pain started to disappear.  Your have to follow the exercises and stretches to rebuild and recuperate.”

~32 year-old male

Filed Under: Patient Testimonials Tagged With: shoulder, shoulder pain and chiropractic

« Previous Page
Next Page »

Subscribe to get our Blog posts in your email.

* indicates required
/* real people should not fill this in and expect good things - do not remove this or risk form bot signups */

Intuit Mailchimp

(We don't spam or sell your email.)

Recent Posts

  • Safer, Healthier Breast Screening in Roanoke
  • Listen to Your Wife
  • First Time In My Life
  • Four-Season Gardening
  • Cry For Help

Categories

Tags

arm and hand numbness avocado recipe avocado smoothie back pain breastfeeding latching problems butternut squash recipe coconut oil collard greens recipe cultured vegetables daikon radish recipe difficult neck movement dill sauerkraut eggplant recipe foot pain GAPS friendly GAPS friendly recipe gentle chiropractic adjustments gluten-free gluten-free recipe headaches headaches and chiropractic healthy chicken salad herb tea high fructose corn syrup hip pain immune system support jaw pain knee pain knee pain and chiropractic low back pain low back pain and chiropractic migraines neck pain neck pain and chiropractic treatment pesto recipe raw fudge sciatica scoliosis separated shoulder and chiropractic shoulder injury shoulder pain shoulder pain and chiropractic sweet potato soup vegetable juice weight loss

Good Nutrition

Warming Broth for a Cold

When you're feeling down with a cold, the last thing you may want to do is cook!  Well, if you keep a few ingredients on hand you can make this nourishing, soothing broth in a few minutes.  If you … [Read More...]

  • Oatmeal is Back
  • Ginger Punch with a Kick
  • Polenta

Children’s Adjustments

Children's chiropractic adjustment at Towers Chiropractic

Children with back pain

Children suffer injuries that lead to misalignments just as adults do. Children generally respond very well and quickly to gentle chiropractic adjustments. A case in point is that of a 5 year-old … [Read More...]

  • Adjusting Children

Towers Family Chiropractic

2302 Colonial Ave, SW, Ste A
Roanoke, VA 24015
(540) 343-6636

Our hours are:
Monday, Wednesday, Friday:
10:00am – 1:00pm and 2:00pm – 6:00pm
Tuesday, Thursday:
7:30am – 11:30am and 12:30pm – 4:00pm
Saturday:
9:00am – 12:00pm

These statements have not been evaluated by the Food and Drug Administration. The information on this website is not intended to treat, diagnose, prevent, or cure any disease.

Copyright © 2025 · Towers Family Chiropractic by Soupbone Creative